Especially handy if you are importing or exporting text
One of the most common things computer user’s do is cut, copy and paste stuff. When you’re cutting or copying from one place in a document to another, there’s not much to the story; when you’re cutting or copying text from a website perhaps, to a Word document on the other hand, things get a bit stickier, because sometimes you do want the copied text to look as it did on the website, and sometimes, you just want it to fit in seamlessly with what you’re already writing.
Microsoft has not been blind to this and did give us some options for cutting, copying and pasting in Word 2007 with the Paste button on the main ribbon. Recognizing that what they’d done so far wasn’t enough, Microsoft went a step further in newer versions of Word by giving users a much better preview of what they’ll get when choosing a particular option.
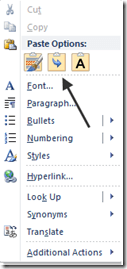
Word’s Paste feature can be accessed two different ways; the first is by clicking the right mouse button in the spot where you want to paste something.
Note: You’ll only get all the Paste options shown if you have previously highlighted and copied some text from another source that has non-standard text in it.
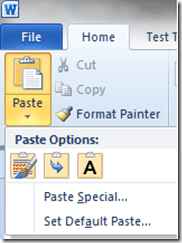
The other way is by clicking on the Paste icon on the main ribbon:
Note: In order to get all of the icons to show up in the drop down menu, you first have to copy some non-standard text from another source.
Customize Word Paste Options
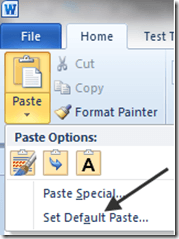
Note the Set Default Paste option that has been added to the bottom of the drop down menu:
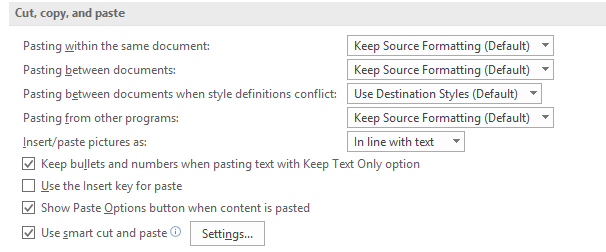
Clicking on it brings up a window for setting the defaults for a myriad of Word options: We only need to look at the defaults for Cut, copy and paste:
Setting defaults for when you paste something, is actually a bigger deal than it might seem. Say for example you have grown used to using Ctrl-C and Ctrl-V for copying and pasting stuff from websites into your Word documents; normally the default is to paste what has been copied in its natural state, i.e. with all the web formatting in place.
If you change the default for Pasting between documents and Pasting from other programs to Keep Text Only, you can save yourself the extra step of having to strip out the formatting manually by first copying everything to Notepad and then copying from there.
At any rate, once you’ve got your defaults set the way you want, using the Paste feature works the same regardless of which way you access it. To use it, first copy some formatted text and/or graphics from a web site:
Next, open or resume working on a document in Word, then pick a spot in your document to paste the stuff you copied by clicking in the document; then, click the Paste icon. You should notice right away that things look different; instead of word choices, there are now icons.
To see how these icons work, slide your mouse slowly over the different options. Moving from left to right the icons represent: Keep Source Formatting, Merge Formatting, and Keep Text Only. You should be able to see what the pasted material will look like in your document as you move your cursor over the three icons.
Keep Source Formatting:
Merge Formatting:
Keep Text Only:
To actually paste in the copied material, click on the one you want and the copied material will be pasted into your document in the format you chose (in this case, Keep Source Formatting).
The new icon based Paste tool with preview should make cutting, copying and pasting a much easier task for anyone that does a lot of moving text around from different applications into Word. Enjoy!


