Without affecting the Chrome OS
Although Chromebooks ship with Chrome OS, a Linux-based operating system, out-of-the-box, they can also run unadulterated Linux distributions without issues. In fact, you can run Chrome OS and another Linux distro simultaneously on the same Chromebook.
In this tutorial, we’ll show you how to install Linux on a Chromebook without affecting the Chrome OS. You’ll also learn how to install the experimental Linux environment built into Chrome OS and a third-party Linux distro (Ubuntu).
Table of Contents

Install Linux Beta (Crostini) on Chromebook
Crostini describes Google’s official project that allows Chromebook users to run Linux without entering the Chrome OS Developer Mode. The major advantage of this feature is that you get to enjoy Linux-based apps and tools in a secured environment. Think of it as a contained virtual machine for running Linux in Chrome OS without having to deal with Linux codes and commands.
This Linux environment has official support from Google and has very little chance of breaking your Chromebook or voiding its warranty. The environment is also protected from malicious apps and files through Sandboxing—one of the security features built into Chromebooks.
Installing this Linux environment on your Chromebook depends on your device’s hardware and software configurations. Not all older Chromebook models support the Linux Beta (Crostini) feature out-of-the-box.
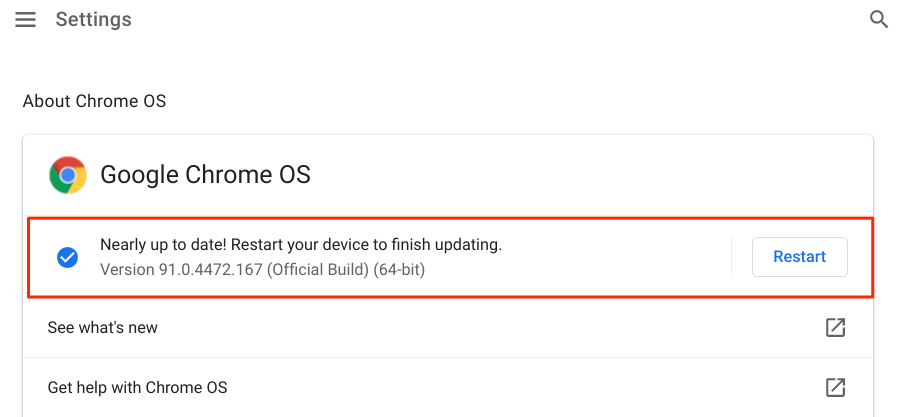
Additionally, installing this Linux environment on Chromebook requires Chrome OS 69 or later. Head to Settings > About Chrome OS to check the Chrome OS version or update your Chromebook’s operating system. Install any available update or restart your device to finish pending updates.
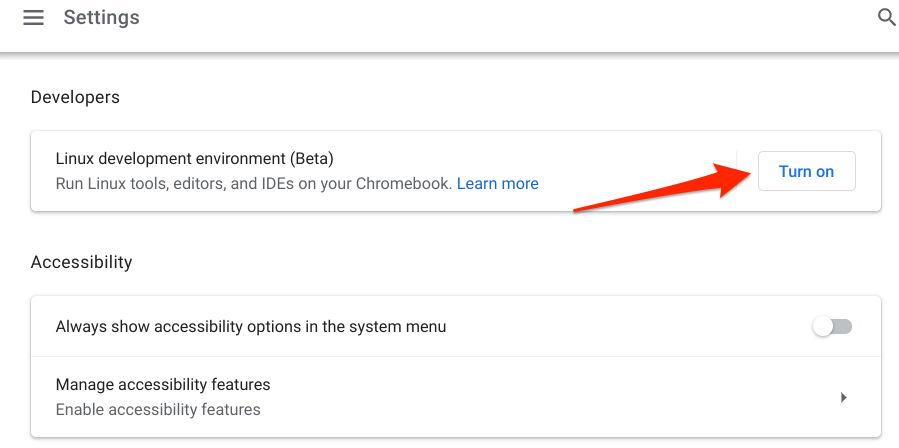
The environment is experimental and locked by default. So, the first line of action is to activate the Linux development environment. Connect your Chromebook to the internet and follow these steps:
- Launch the Settings app, expand the Advanced category, scroll to the Developers section, and select the Turn on button on the “Linux development environment (Beta)” row.
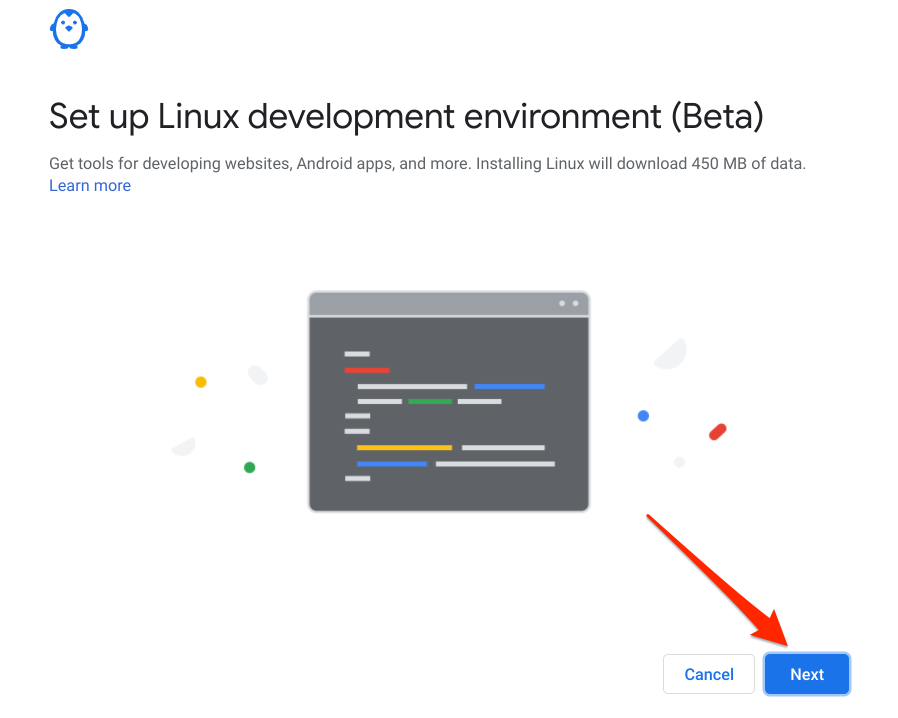
- Select Next to continue.
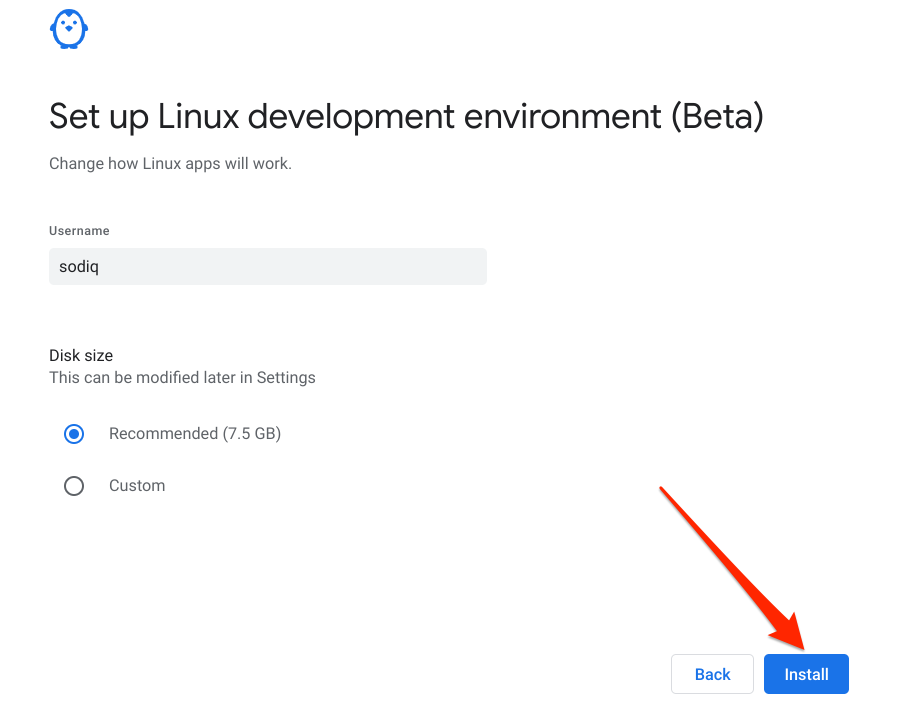
- Create a username, select the recommended disk space, and select Install.
Now let’s show you how to install a third-party Linux distro on your Chromebook.
First Things First: Create a Recovery Drive
Although installing a third-party Linux distro on Chromebook is pretty straightforward, things can sometimes go south during the process. Therefore, we strongly advise creating a backup of your device using the Chromebook Recovery Utility. This requires an external storage disk with at least 8GB of free storage space.
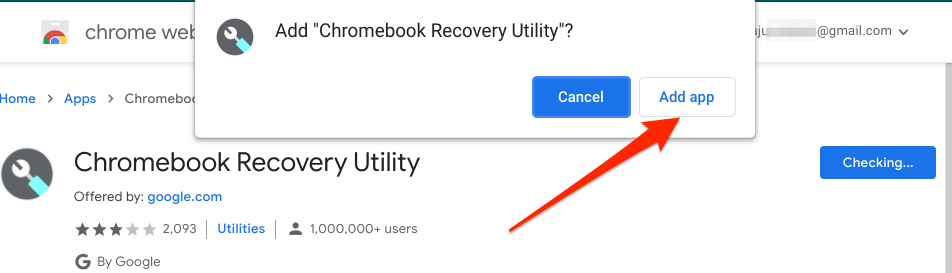
- Launch Chrome, head to the Chromebook Recovery Utility page on the Chrome web store, and select Add to Chrome.

- Select Add app on the confirmation prompt.
You should see the download progress at the bottom-left corner of your Chromebook’s screen. Plug an external storage drive with 8GB or larger storage into your Chromebook when you get an installation success alert in the notification area.
Note that the recovery utility will erase all data and partitions on the drive. So, make sure you back up any important data on the drive to another device before using it as your Chromebook’s recovery disk.
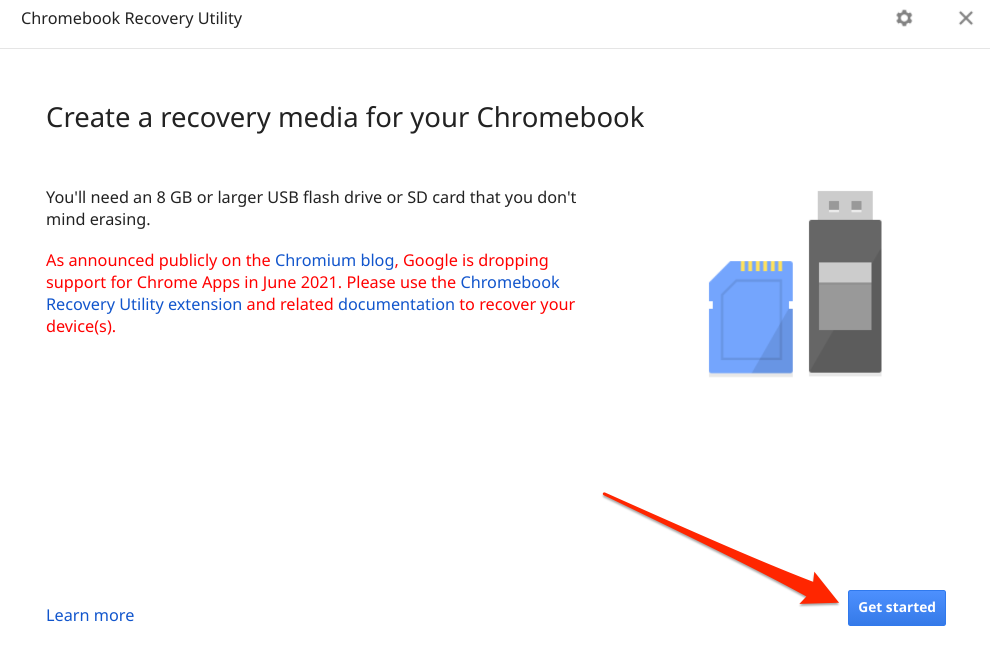
- Launch the Chrome Recovery Utility in the app launcher.

- Wait for the app to prepare your device for recovery and select Get started.
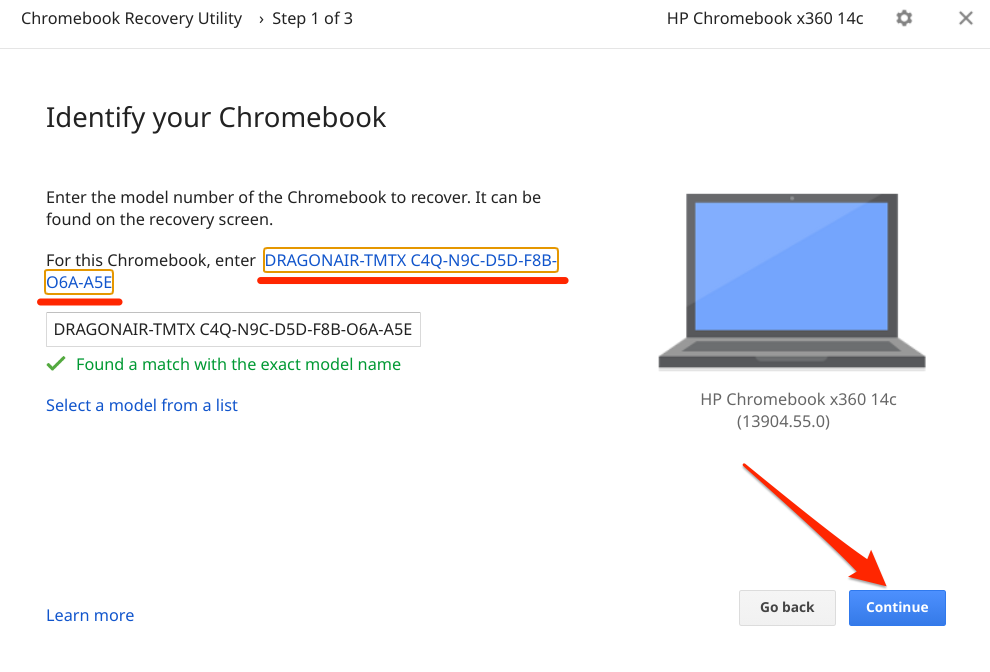
- The alphanumeric digit on the screen is your Chromebook’s model number. Enter the digits in the provided dialog box and select Continue to proceed.
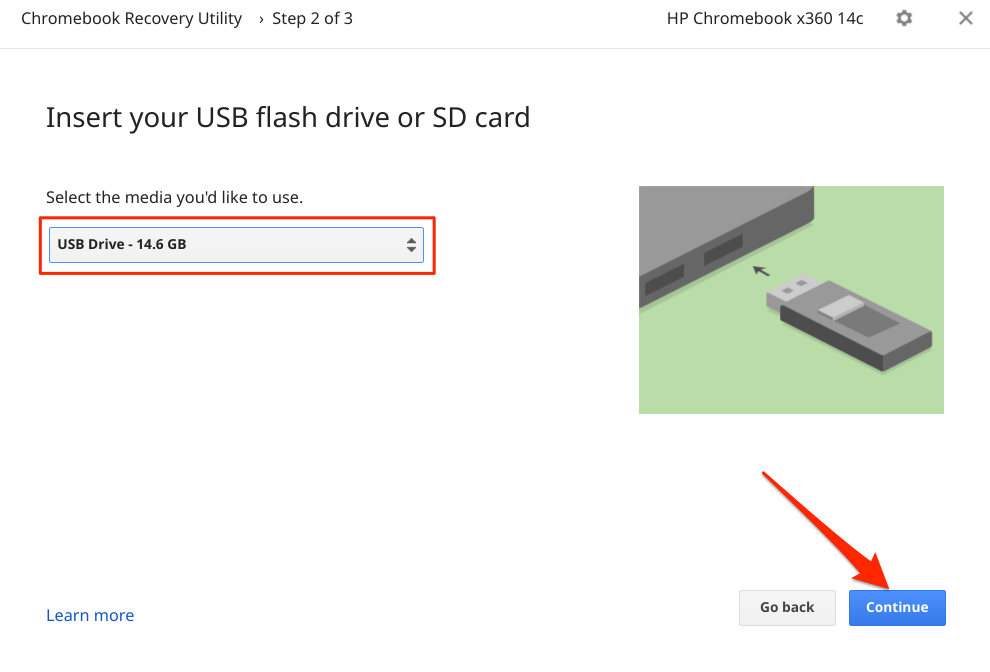
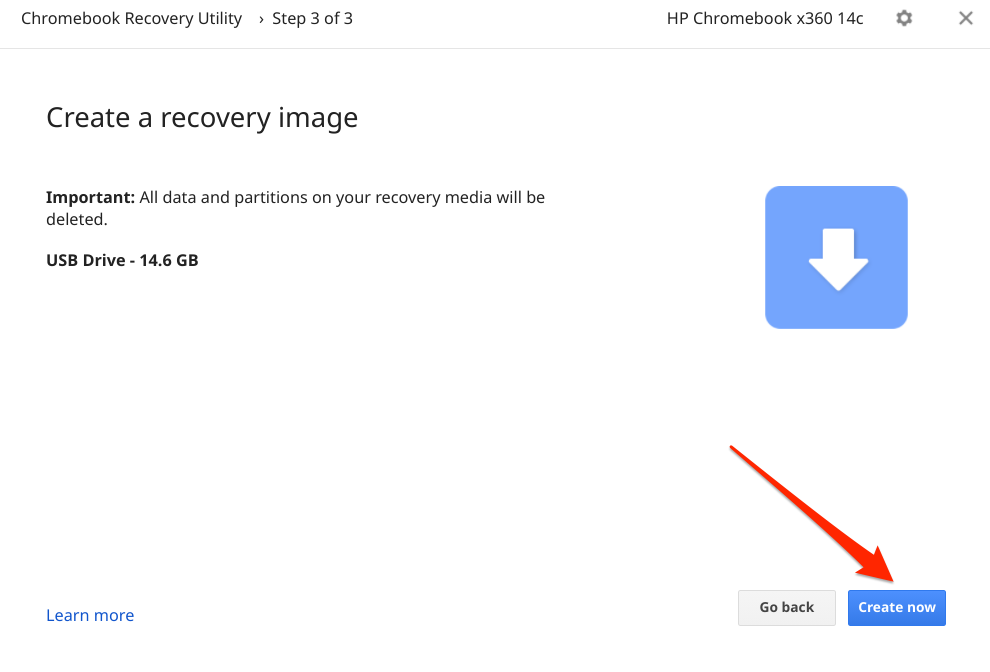
- Select the media device you’d like to use to create the recovery image and select Continue.
- Select the Create now button.
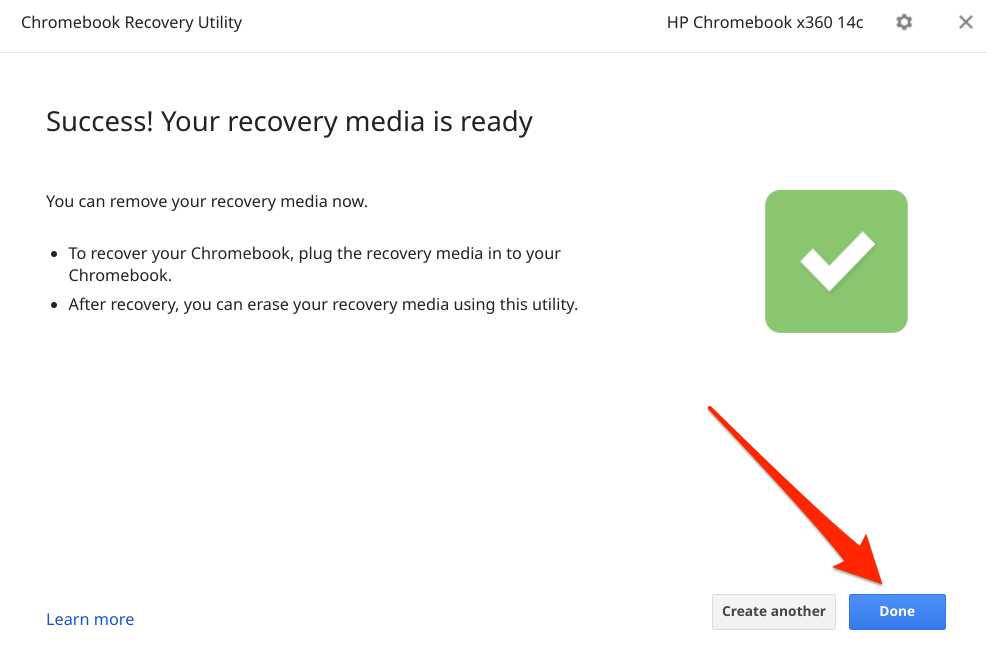
Wait for the utility to download and write the necessary files to the recovery media. This might take several minutes or hours depending on factors like your Chromebook model and Chrome OS version. Removing the recovery drive will interrupt the download process, so ensure the drive fits tightly in your Chromebook’s USB port.
You’ll also need a fast internet connection to download files that’ll constitute the recovery media. So, make sure your Chromebook is connected to a Wi-Fi or an Ethernet network.
If something ever goes wrong while installing Linux, shut down your Chromebook, boot into recovery mode (press Esc + Refresh + Power button), insert the recovery media, and follow the on-screen instructions.
Enable Developer Mode in Chromebook
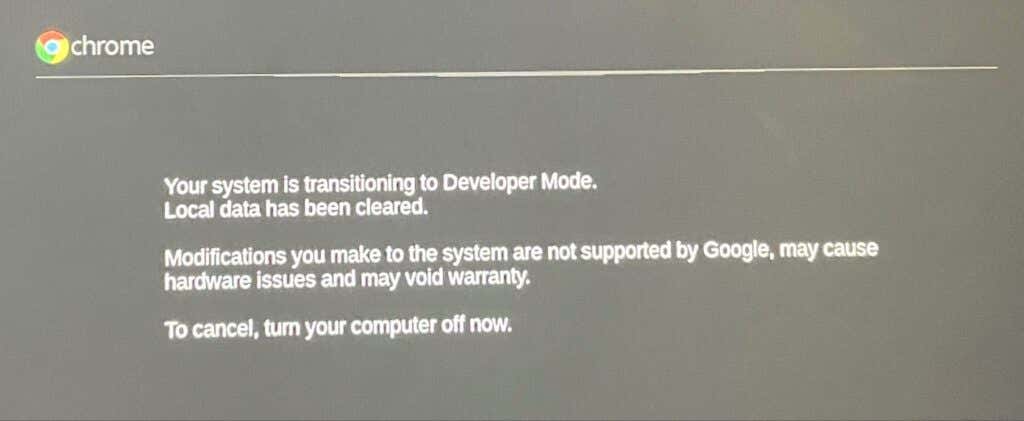
You need to have your Chromebook in Developer Mode to install any Linux distribution. That will erase all data stored on your Chromebook’s storage, so ensure you backup your files to the cloud or an external disk before activating Developer Mode.
It’s also important to state that activating Developer Mode will disable many built-in security features on your device. Likewise, the operation might also void your Chromebook’s warranty. Power off your Chromebook and follow the steps below.
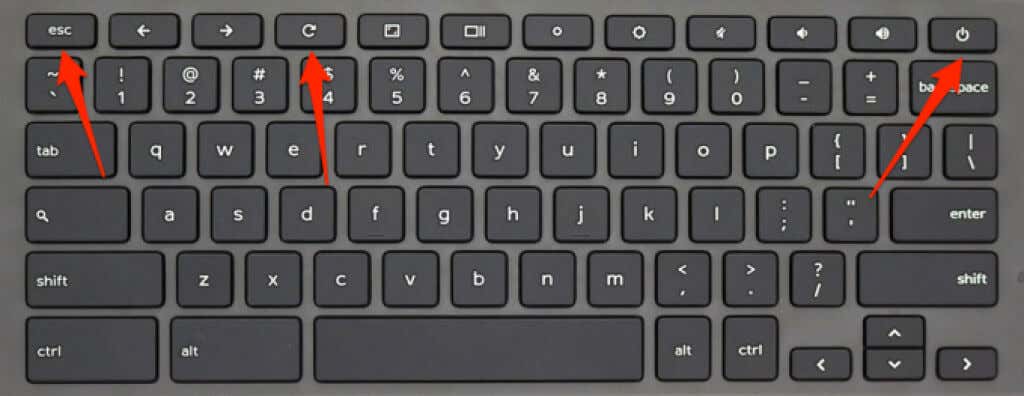
- Press and hold the Esc + Refresh (or F3) keys and hold the Power button.
- Release the buttons when a recovery screen comes on the Chromebook’s display.
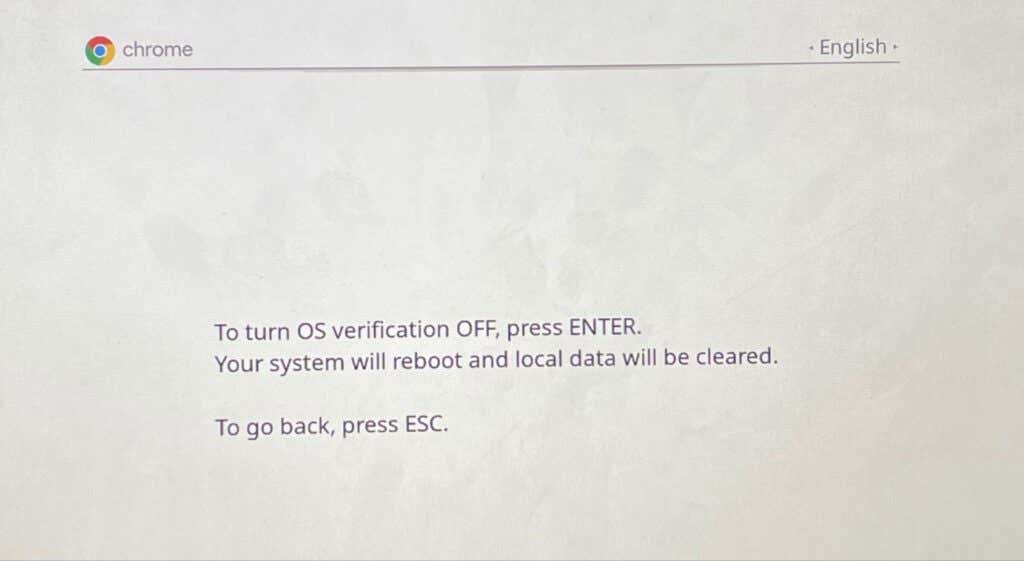
- Ignore the “Please insert a recovery USB stick or SD card” instruction on the screen. Press Ctrl + D to activate Developer Mode.

- Press Enter to turn off OS verification. That will “unlock” your Chromebook to boot non-Google operating systems.
- Press Ctrl + D again and wait for a couple of minutes to boot your Chromebook with Developer Mode enabled.

You’ll get an on-screen notification that your Chromebook is now transitioning into Developer Mode. Do not turn off your Chromebook during the process and make sure it holds enough battery power (50% or more).
Set up your Chromebook from scratch as though it is a new device and proceed to the next section to learn how to install Ubuntu Linux on your Chromebook.
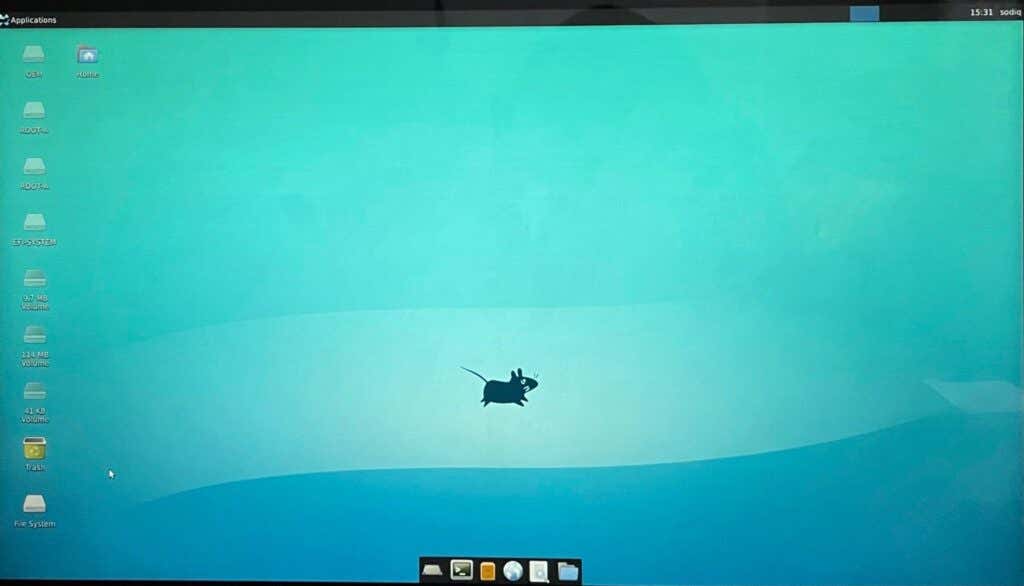
Install Ubuntu Linux on Chromebook (Using Crouton)
One major advantage of installing Linux via Crouton is that you don’t need to reboot your Chromebook to switch between Chrome OS and Linux. You can do that using key combinations or shortcuts. Additionally, the Linux distro has direct access to your Chromebook’s hardware and files. So you can switch to Linux and still access files created in Chrome OS.
Crouton achieves this by creating a “chroot” binary environment that runs on the Chrome OS. Unlike Google’s “Crostini” project, Crouton provides a “pure” Linux environment. The only limitation is that it is limited to Ubuntu only. Crouton (presently) doesn’t support other Linux distributions. Visit the Crouton directory on GitHub to learn more about the Chroot environment and how it powers the Ubuntu Linux distro on Chromebook.
- Download and save the crouton file to your Chromebook’s Downloads files.

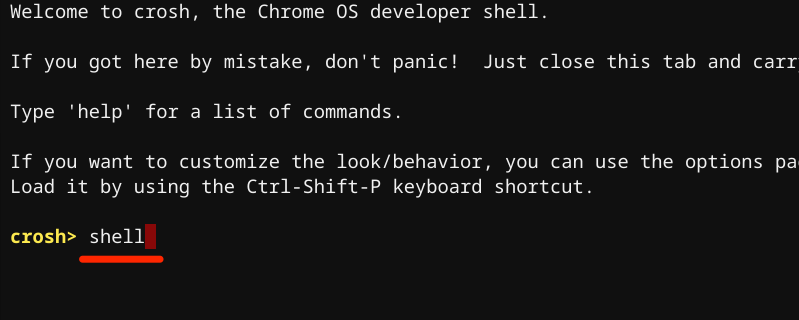
- Press Ctrl + Alt + T to launch Crosh—Chrome OS’ Command Shell environment.
- Type or paste shell in the terminal and press Enter.
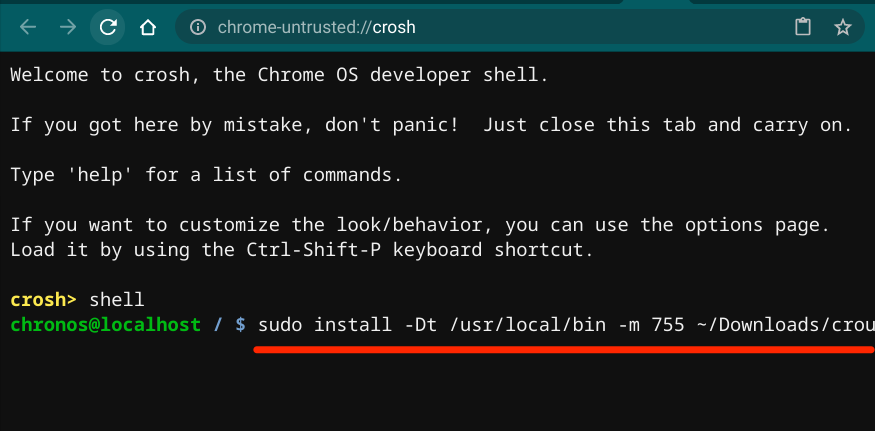
- Afterward, paste sudo install -Dt /usr/local/bin -m 755 ~/Downloads/crouton in the terminal and press Enter. The command will convert the downloaded crouton text file into an executable file.
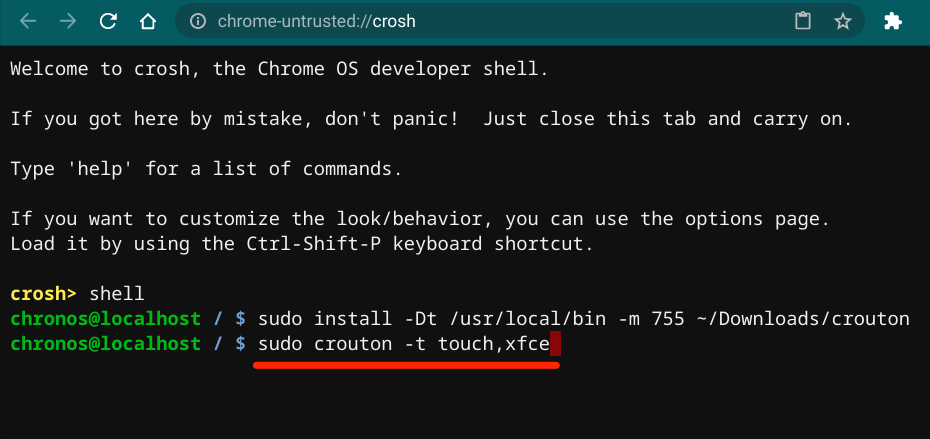
- Now, type or paste sudo crouton -t xfce in the terminal and press Enter. If your Chromebook has a touchscreen, run this command instead: sudo crouton -t touch,xfce.
That’ll download and install the Ubuntu Linux package on your Chromebook using the XFCE—a fast and lightweight desktop environment that consumes low system resources. You can install Linux on your Chromebook using other desktop environments like Unity, GNOME, or LXDE. However, XFCE is recommended because it is a lot faster. Besides, Chromebooks are low-end devices with limited system resources. That makes XFCE the best-suited option.
If you’re feeling experimental, you can install Linux with other desktop environments by running the following commands in the Crosh terminal:
- Unity Desktop environment: paste sudo crouton -t unity and press Enter.
- GNOME Desktop environment: paste sudo crouton -t gnome and press Enter.
- LXDE: paste sudo crouton -t lxde and press Enter.
The installer will download the necessary Ubuntu packages. Make sure your Chromebook stays connected to the internet during the download and installation process. The entire operation will take a couple of minutes or hours depending on your connection speed.
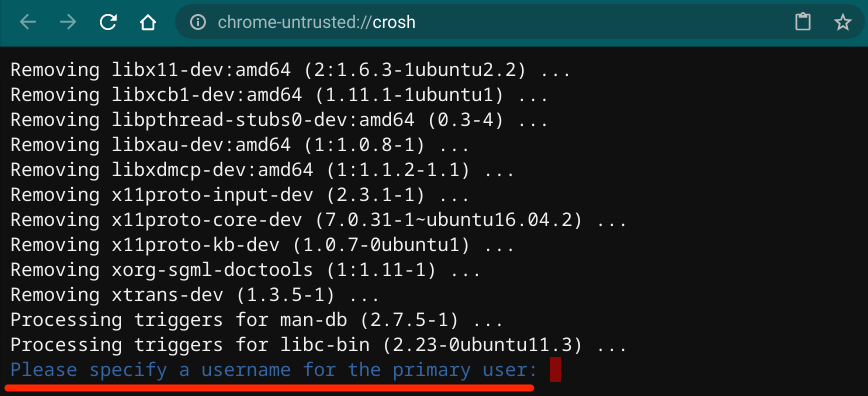
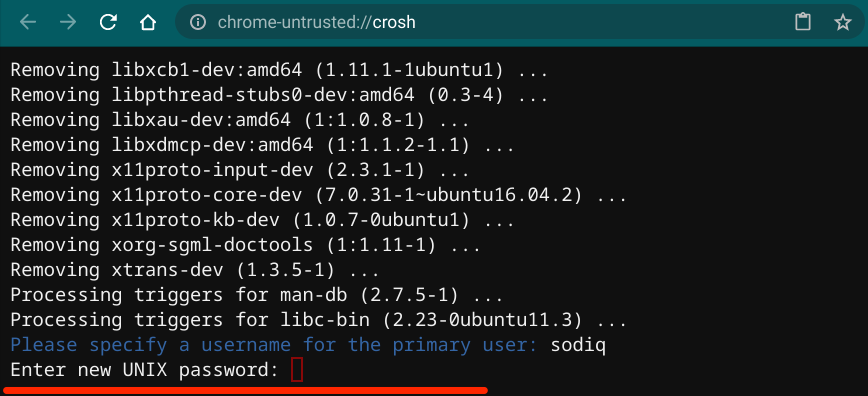
- Type a preferred username and press Enter.
- Type a password and press Enter.
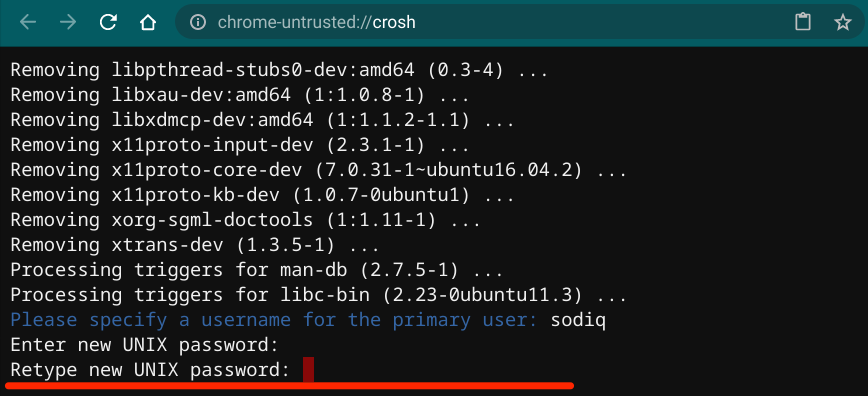
- Re-enter the password and press Enter to continue.
You can start using Ubuntu Linux on your Chromebook when you get a “password updated successfully” message.
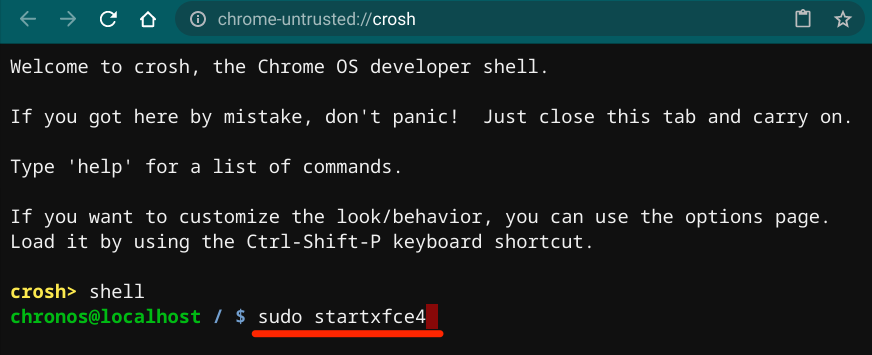
Press Ctrl + Alt + T to launch Crosh, type shell in the terminal, press Enter, type/paste sudo startxfce4 and, press Enter.
If the Ubuntu Linux environment is loading a blank screen, type your username, press Enter, type your password, and press Enter. If the problem persists, switch back to Chrome OS and back to Ubuntu.
Use the keyboard shortcuts Ctrl + Alt + Shift + Back or Ctrl + Alt + Shift + Forward to switch back and forth between both operating systems.
Remove or Uninstall Linux On Chromebook
Is the Linux distribution crashing your device? Or you no longer want to run Linux on your Chromebook. All you need to remove the Linux distro is to disable Developer Mode and re-enable OS verification. Power off your Chromebook, press Space Bar on the page that displays “OS verification is OFF,” and press Enter to confirm the action.
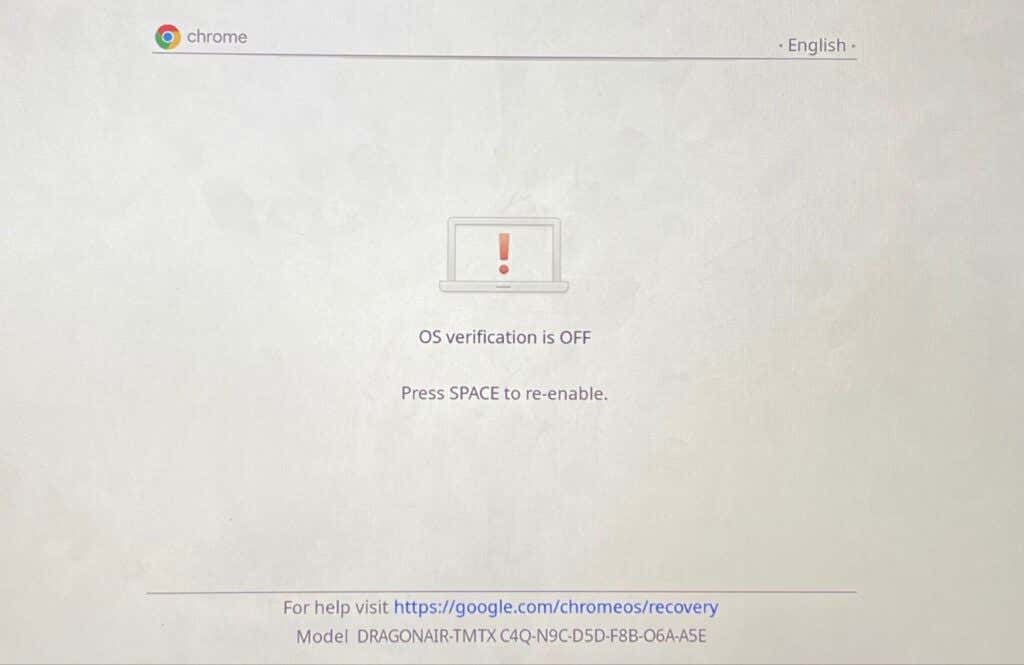
That’ll re-enable OS verification and boot Chrome OS normally. Note that disabling Developer Mode will also erase your Chromebook’s data.
Subscribe on YouTube!
Did you enjoy this tip? If so, check out our YouTube channel from our sister site Online Tech Tips. We cover Windows, Mac, software and apps, and have a bunch of troubleshooting tips and how-to videos. Click the button below to subscribe!
Subscribe