Luckily, there are a few easy solutions
The Domain Name System (DNS) server is where all of the domain names for the sites you’ve visited are stored. When searching a domain name in a web browser, it is forwarded by your router to a DNS server. If the particular site’s domain name has been saved, it then returns the corresponding IP address. This makes the loading process for those sites particularly faster.
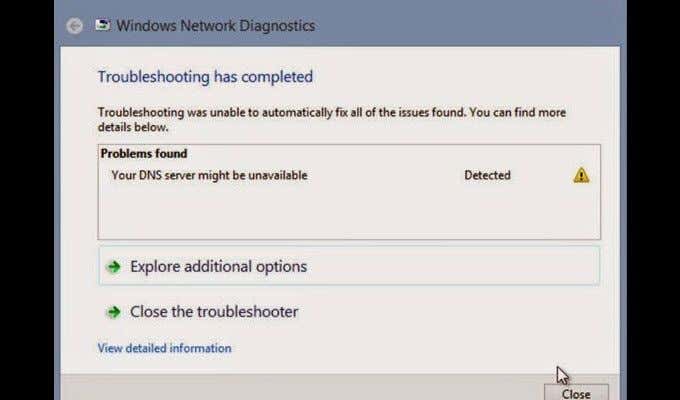
As great as this process is, it’s not uncommon for the DNS server to fail to establish a connection from time to time. Attempting to troubleshoot your web browser in this instance can often result in a ‘DNS server not responding’ error.

Many factors could cause this particular error to show up on your screen. The most prominent of which is the possibility that the server itself is currently experiencing an outage. Luckily, this problem is often accompanied by a few easy solutions.
How To Fix The “DNS Server Unavailable” Error
Have you’ve received an error that the DNS server is unavailable? For a quick fix, these problems can sometimes be corrected by something as simple as changing browsers, messing with a few of your firewall settings, or rebooting your router. It’ll be up to you to figure out the cause and subsequent correction for the problem.
Start by using a different browser for the web pages you’re trying to open. This means that if you’re currently receiving the error while using the Mozilla Firefox browser, switch it up to Microsoft Edge or Google Chrome. Should the problem persist, we can move on to testing out other devices.
Attempt to open a webpage using a mobile device, on the same network, to ensure that the problem isn’t the result of hardware failures. It would also be beneficial to attempt to connect to the same webpages using your data plan to identify if the cause is, in fact, with the DNS server.
Once you’ve exhausted these steps, reboot your router. If the “DNS server unavailable” error is still present, we’ll have to undergo a few more effective methods.
Flushing Your DNS (Windows)

The most effective method for fixing the issue with the DNS server being unavailable is to flush it using Command Prompt.
- Pull up the Run dialog by simultaneously pressing the Windows key and R key.
- Type cmd into the field and press Enter.
- In the Command Prompt window, type ipconfig /flushdns and press Enter.

- Follow up by typing ipconfig /release and press Enter.

- Finally, type ipconfig /renew and press Enter.

- Close out of the Command Prompt window and reboot your system.
Flushing Your DNS (MacOS)

You can also flush the DNS on a Mac. The way in which you do this will vary slightly depending on the version of Mac your computer is running. It often only involves a change in the syntax used during the process.
- Open a Finder window and then head into Applications, followed by Utilities, and ending in the Terminal.
- Enter in the following syntax pertaining to the version of MacOS you’re currently using:
- MacOS High Sierra – sudo killall -HUP mDNSResponder; sleep 2; echo macOS DNS Cache Reset | say
- MacOS Sierra – sudo killall -HUP mDNSResponder;say DNS cache has been flushed
- MacOS Mojave – sudo killall -HUP mDNSResponder;sleep 2;
- MacOS X El Capitan/Yosemite – sudo dscacheutil -flushcache;sudo killall -HUP mDNSResponder;say cache flushed
- Press the Return key, enter your password, and then hit the Return key once more.
- Await the audio alert that indicates a successful DNS flush before exiting the Terminal.
The MacOS X cache clearing will need a few added steps in order to fully flush it out. You’ll have to flush both MDNS and UDNS caches on top of the steps previously taken.
Before exiting from the Terminal, perform the following commands:
- For the MDNS cache, type sudo discoveryutil mdnsflushcache
- For the UDNS cache, type sudo discoveryutil udnsflushcaches
Remove Multiple Antiviruses

“You can never have too much protection.” This may be somewhat true in the real world, but in the world of technology, having multiple antivirus programs installed on the same computer can actually hinder the protection provided.
Check to see if you have two or more antivirus programs currently running as this may be the reason for the DNS issue. Once you disable all additional programs, reboot your system and the problem should resolve itself.
Ensure that moving forward you only keep a single software program running to help defend yourself from unwanted malware attacks. This not only increases security but can help you avoid running into more DNS server errors.
Changing DNS Servers

If you’ve already attempted all fixes written here and are still receiving the same “DNS server unavailable” error, it may be in your best interest to change your DNS servers. There are plenty of public DNS from which to choose, Google’s free DNS being one of the more popular choices.
The process for this is very simple and can be done in a few clicks, depending on where you choose to change it. We’ll be using the Windows operating system in each of our examples.
DNS Changes via Router

- Access your router by launching your web browser and entering the Default Gateway address into the URL bar.
- You can find the Default Gateway by opening a Command prompt window, typing ipconfig, and pressing Enter. Copy the numbers located beside Default Gateway in the pulled up information.

- Login to the router using the proper credentials.
- Locate your internet account information which can often be found in a similarly named tab.
- Navigate to the DNS server and select the option that best mirrors your used internet protocol (IPv4 or IPv6).
- Enter the address of the DNS server you want to use in place of the current one.
- Google’s DNS server will be 8.8.8.8 in the preferred DNSv4 and 8.8.4.4 in the alternate DNS server. In the case of IPv6, you’ll want to use 2001:4860:4860::8888 and 2001:4860:4860::8844 respectively.
- Save the edited information and exit the router interface.
DNS Changes via Windows OS

- Access your network connection properties by launching the Run function (Windows key + R) and typing in ncpa.cpl. Press Enter.
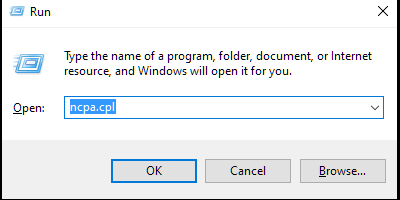
- Windows 10 users can right-click the Windows icon at the lower left of the desktop screen and select Network Connections from the menu.
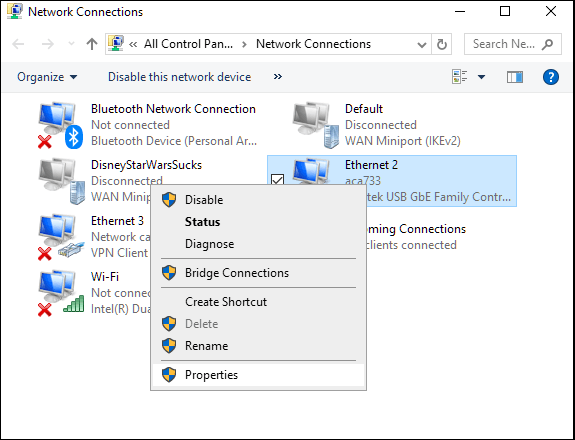
- Select the network adapter currently in use. WLAN for WiFi connections and LAN for direct connection, usually via ethernet cable.
- Windows 10 will have your options on the left side panel. Select one and choose Change adapter options from the main window.
- Right-click your choice and select Properties.
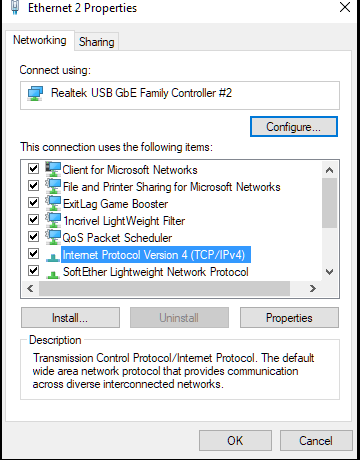
- In the Networking tab, highlight your IP version (v4 or v6) from the menu and click the Properties button.
- Click the radial for Use the following DNS server addresses: to enable editing capabilities.
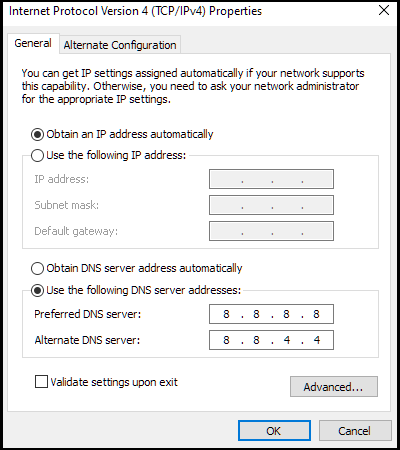
- Enter in the DNS server addresses you plan to use.
- If you had been using a previous DNS server not obtained automatically, remember to annotate the addresses just in case you want to return using them at a later date.
- Finalize the changes by clicking OK.
Test New DNS Server
Once the DNS servers have been changed, open a browser and attempt to launch a well-known site like www.google.com. If the site is immediately accessible, then the new DNS is functioning properly. If not, enter one of Google’s IP addresses, 172.217.16.195, directly into your browser and hit Enter.
Wait for the familiar Google logo and search bar to appear. If this also fails, then the problem may lie with the internet and not the DNS server itself. Contact your internet service provider for additional help if this is the case.


