One of these should do the trick
File Explorer is the default file management tool on Windows devices. Like every other system processes on Windows, File Explorer also has its occasional moments of failure. If you find Windows Explorer not responding during usage, there are a few things you can try.
We’ve written a comprehensive guide covering tips to follow when Windows Explorer keeps crashing. In this article, we’ll rump through nine fixes to try when you launch the File Explorer and it keeps loading or fails to open files and folders.

1. Modify Your PC’s Display Layout
This is a rather bizarre but effective solution to Windows Explorer not responding. Apparently, using an unrecommended screen layout and resolution could cause the File Explorer to malfunction.
Check your PC’s display settings and make sure you’re using the recommended scale/layout. Go to Settings > System > Display and ensure the size of text, apps, and other items is set to 100% or whatever option Windows recommends.
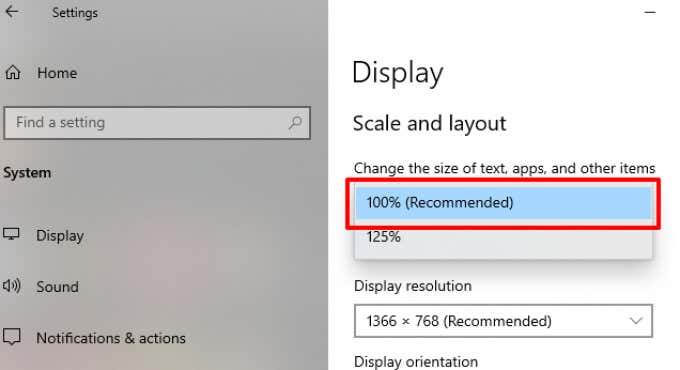
If your PC’s display scaling is already set to 100%, try changing it to 125% and back to 100% again.
2. Kill and Restart the File Explorer
If Windows Explorer is still not responding after changing your PC’s resolution, terminate the Windows Explorer process and start it again. There are several ways to restart Windows Explorer:
Using Task Manager
Launch the Windows Task Manager (press Ctrl + Shift + Esc), right-click on Windows Explorer in the Apps section, and click End Task to terminate File Explorer.
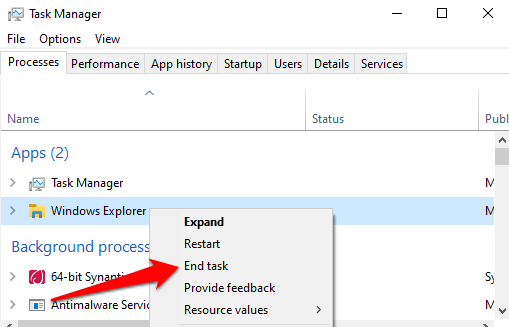
Restart the Windows Explorer by clicking the folder icon in the taskbar. Alternatively, use the Task Manager: click on File on the menu bar and select Run new task.
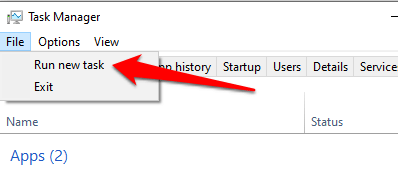
Type explorer.exe in the dialog box and click OK.

That will start Windows Explorer immediately. Now proceed to check if you can access your files and folders in File Explorer without any lag.
Using Command Prompt
You can also use the Command Prompt utility to terminate and reinitiate the Windows Explorer. Right-click on the Windows icon and select Command Prompt (Admin) from the Quick Access menu. Input taskkill /f /im explorer.exe in the console and press Enter.
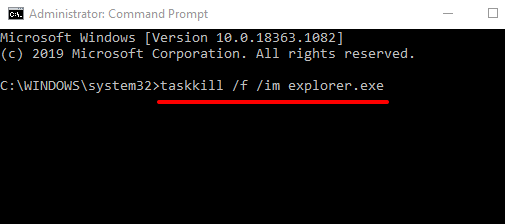
Your PC’s taskbar and desktop icons will disappear when you terminate the Windows Explorer. That’s normal and only temporary. To restart the File Explorer, input start explorer.exe in the Command Prompt window and press Enter to proceed.

Restart File Explorer Using A BAT File
BAT files let you easily automate tasks and actions. If File Explorer fails to respond quite often and restarting the process usually resolves the problem, you should create a BAT file dedicated to restarting the File Explorer at the click of a button.
- Right-click on an empty space on the desktop. Click New and then select Text Document.
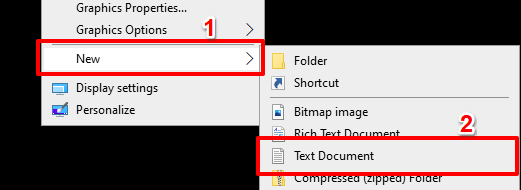
- Name the document Restart Explorer and press Enter.

- Double-click on the newly-created file to open with Notepad.
- Paste the command below in the document:
taskkill /f /IM explorer.exe
start explorer.exe
exit
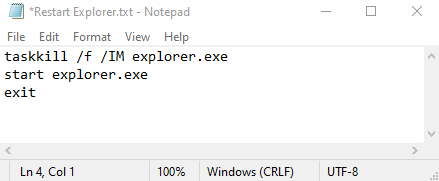
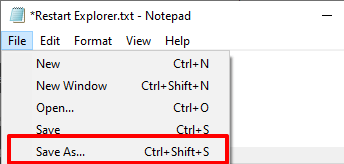
- Click on File in the menu bar and select Save As.
- In the FIle name dialog box, rename the file Restart Explorer.bat and make sure the Save as type option is set to All Files.
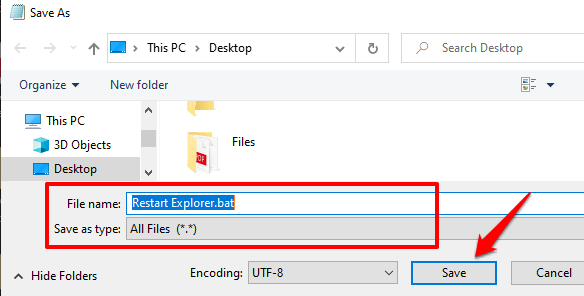
- Click Save to proceed.
To use the newly created BAT file to restart the Windows Explorer, return to the Desktop, right-click on the file, and select Run as administrator.
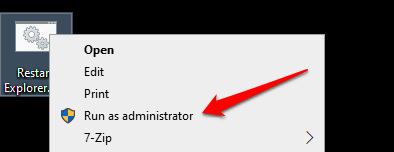
Windows will run the command in the BAT file through Command Prompt and restart the Windows Explorer.
3. Check for Corrupt System Files
When some system files get damaged, missing, or corrupt, some core Windows functionalities (like the File Explorer) may begin to malfunction. Thankfully, this is easy to fix. The System File Checker will scan your PC for corrupt or missing system files and fix or replace them accordingly.
Follow the steps below to run the System File Checker on your Windows 10 computer.
1. Right-click on the Start menu icon and select Command Prompt (Admin).
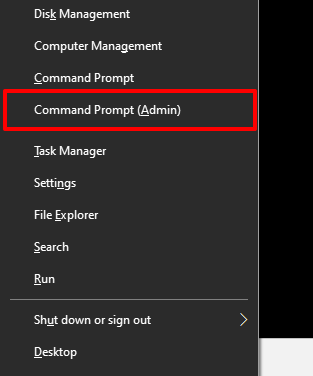
2. Type or paste the command below in the Command Prompt console and press Enter.
sfc /scannow
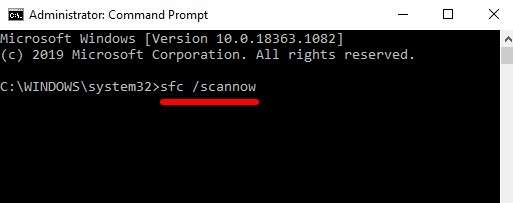
If the Windows File Explorer is still not responding when Command Prompt is done executing the command, restart your computer and try again.
4. Clear File Explorer History
The Windows File Explorer keeps a log of all previous actions and activities—recently accessed files and folders, searches, address bar entries, etc. The Windows File Explorer may respond slowly or crash when the utility’s history accumulates to a certain point. Try clearing the File Explorer history and check if that fixes the problem.
1. Type file explorer options in the Windows search bar and click File Explorer Options in the results.
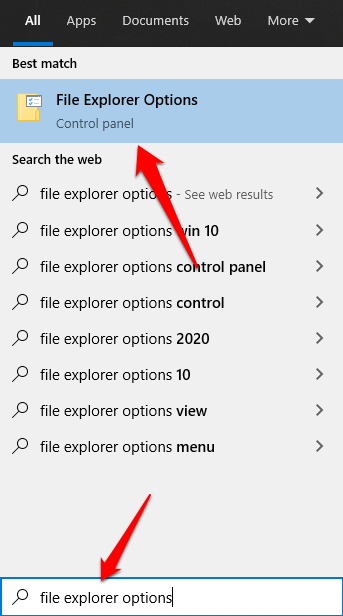
2. In the General tab, click the Clear button to the right of the option that reads Clear File Explorer History. You’ll find that in the Privacy section.
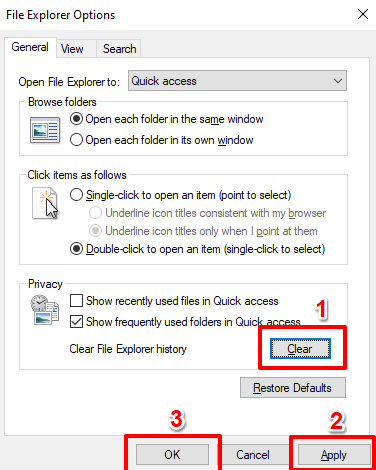
3. Click Apply and then OK to save the changes.
File Explorer should now be stable and functional when you relaunch it. Otherwise, proceed to the next solution.
5. Update Your PC’s Video Driver
According to Microsoft Support, the Windows Explorer could stop working if your PC’s video driver is corrupt or outdated. If you still can’t navigate your files and folders because the Windows File Explorer is not responding, try downloading and installing the latest video driver update for your PC. Connect your computer to the internet and follow the steps below.
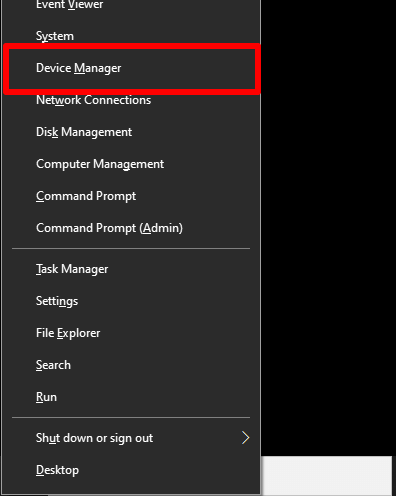
Right-click the Start or Windows icon and select Device Manager.
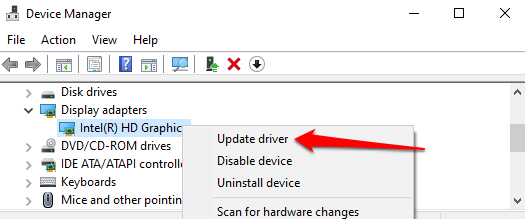
Expand the Display adapters category, right-click on your PC’s video/graphic adapter, and select Update driver.
Choose Search automatically for updated driver software.
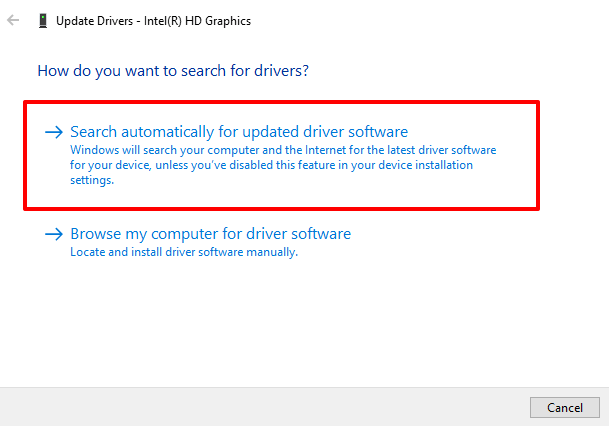
That will prompt Windows to search the internet and your computer for the latest video driver for your PC.
6. Update Your PC’s Operating System
File Explorer may crash and fail to respond if your Windows 10 version is out-of-date. Download and install any available updates and check if that resolves the issue.
Windows updates often ship with security patches, driver updates, bug fixes, and solutions to other functional issues affecting Windows applications and processes. If the Device Manager doesn’t find an update for the video driver, consider updating your PC’s operating system.
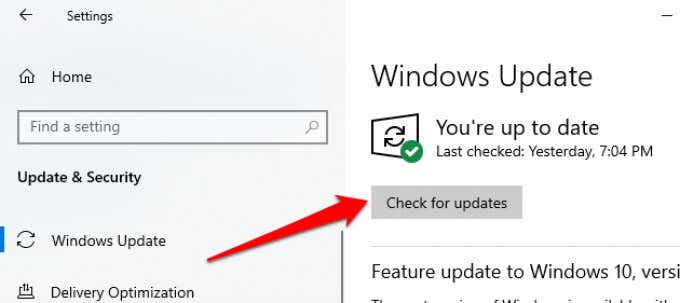
Go to Settings > Update & Security > Windows Update and click on the Check for updates.
7. Scan Your PC for Viruses and Malware
If you have an antivirus or antimalware software installed on your PC, run a thorough scan for hidden viruses and malware. Refer to this guide to learn how to completely remove stubborn malware from your PC using trusted software like Malwarebytes.
You can also use Windows built-in antivirus tool, Windows Defender, to nuke malware and viruses.
8. Check for Memory Problems
Several applications may malfunction on your PC if there’s a problem with the Random Access Memory. Run the Windows Memory Diagnostics tool to check your computer for memory problems. Make sure you save your work and close any open applications before you proceed.
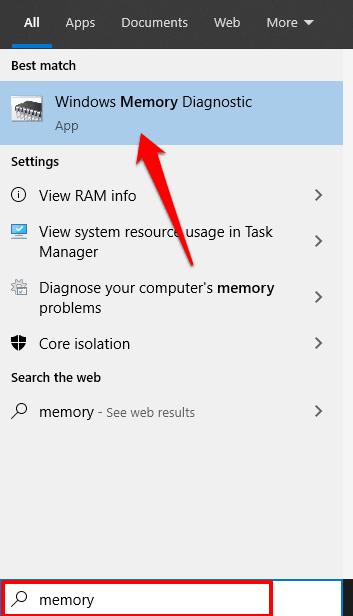
1. Type memory in the Windows search bar and select Windows Memory Diagnostic in the result.
2. The two will present you with two options. Select the option that reads “Restart now and check for problems (recommended).”
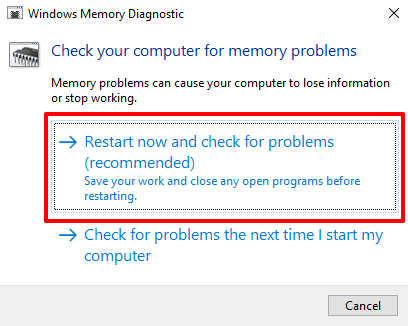
The Windows Memory Diagnostics will scan your PC and fix any memory-related issues that it finds.
9. Perform a System Restore
Did the File Explorer start after installing an app, a driver, software update, or after changing certain system configurations? Try rolling your PC back to a previous configuration (or restore point).
Note that reverting to a previous restore point will change some system settings. Recently-installed programs and drivers will also be deleted from your PC. Follow the steps below to roll back to a restore point.
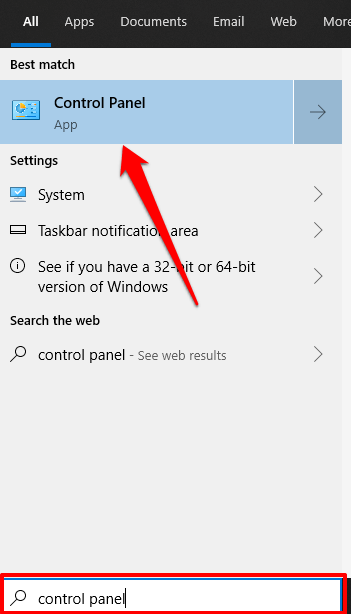
1. Type control panel in the Windows search bar and click Control Panel on the results.
2. Click on Recovery.
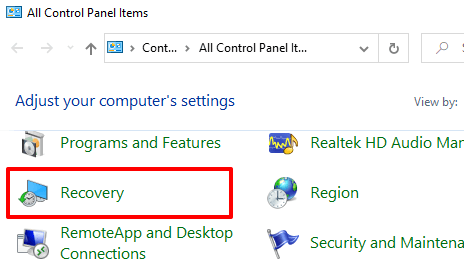
3. Select Open System Restore.
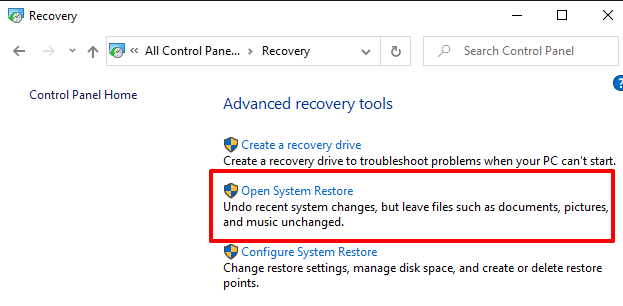
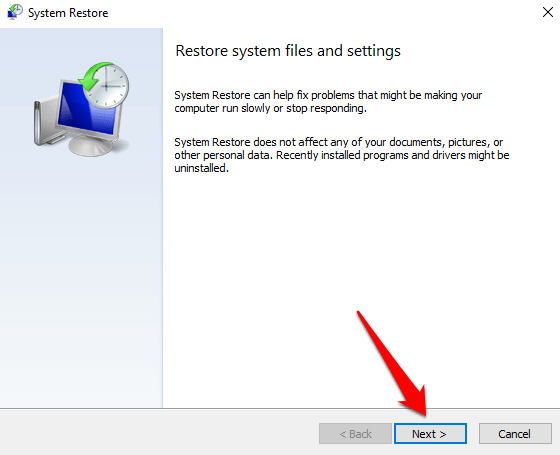
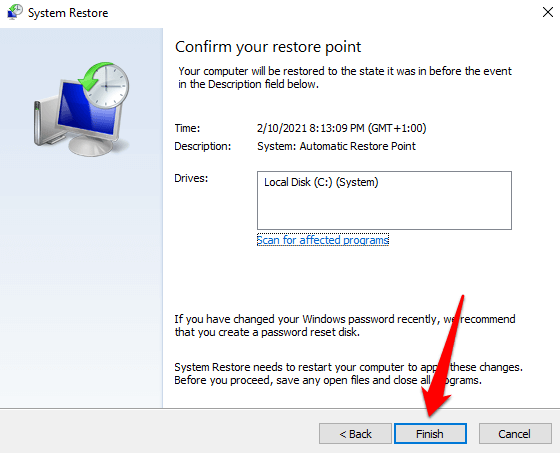
4. In the System Restore window, click Next to proceed.
5. The latest/newest system restore point will appear on the list. Select it and click Next to proceed.
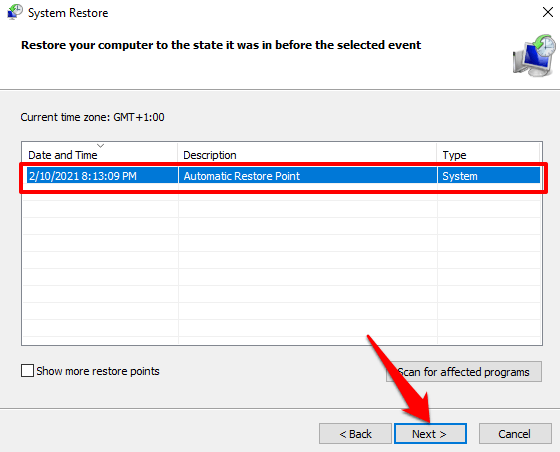
Check the ‘Show more restore points’ option to reveal other (older) restore points.
6. Click Finish to commence the system restoration.
If you don’t find a restore point, that’s probably because the System Restore feature isn’t active on your computer. Learn how to enable or disable System Restore on Windows devices.
Get the File Explorer Working Again
We’re pretty confident that at least one of the troubleshooting methods listed above should resolve issues with Windows Explorer not responding. If the problem persists, restarting your PC in Safe Mode or performing a clean boot should help.


