You'll be up and running in no time
If you want to learn more about web design and development, installing Internet Information Services (IIS) on your Windows 10 computer is a good method. IIS is a free Windows Feature included in Windows 10, so why not use it?
IIS is a full-featured web and FTP server with some powerful admin tools, strong security features, and can be used to host ASP.NET and PHP applications on the same server. You can even host WordPress sites on IIS.
There are three ways to install and set up a website in IIS on Windows 10; using the Graphical User Interface (GUI), PowerShell, or Windows CMD. We’ll be using each method to do a basic installation of IIS.
Install IIS Using The GUI
This is the point-and-click method to set up a website in IIS. It’s the ideal method if you haven’t learned PowerShell or Windows commands.
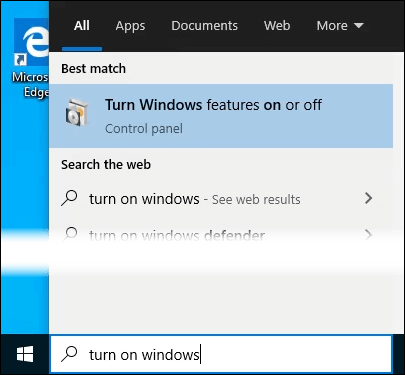
- Start typing “turn on windows” in the Search bar. The Turn Windows features on or off utility will show as a result. Click on it.
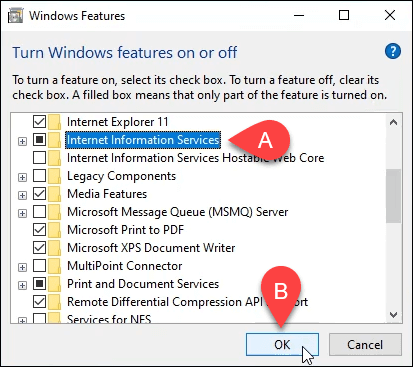
- The Windows Features window will open. It may take a bit for the different features to load. Once it does, click on the checkbox next to Internet Information Services and then click the OK button.
- The installation will begin and can take several minutes. Once it’s completed, click on the Close button.

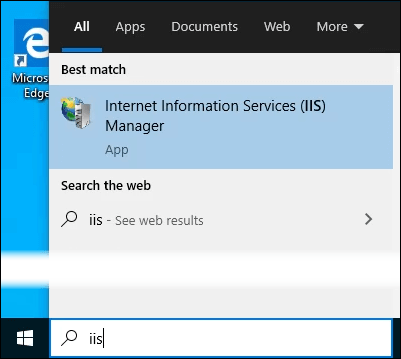
- To ensure that IIS is installed and working, type IIS in the Search bar near the Start button. You’ll see the Internet Information Services Manager as a result. Click on that to open it.
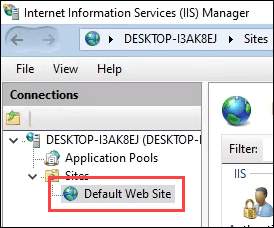
- When IIS Manager opens, look in the left pane of the window under Connections. Expand the tree menu until you see Default Web Site. That’s a placeholder site that is installed with IIS. Click on it to select it.
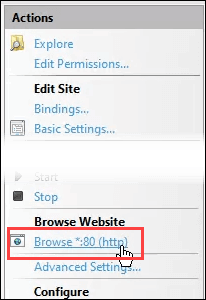
- On the right side of the IIS Manager look under the Browse Website section. Click on Browse *:80 (http). That will open the default web site in your default web browser.
- You’ll see a web page like the following. Notice in the address bar that it says localhost. That’s the address to type in to go to your new website.

Create Your First Web Page for IIS
Before we go into the other two methods of installing IIS, let’s see where the files that make your website are stored. We’ll also make a very basic web page. Once you know how to do this, you’ll know the basics to jump into learning web design and development.
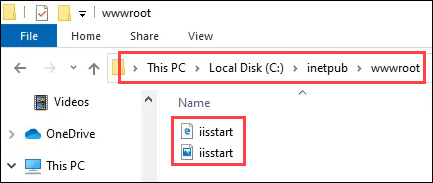
- After IIS is installed, open File Explorer. Navigate to C:\intepub\wwwroot. That’s where the files that make up the website need to be stored. You’ll see the default IIS web page file, iisstart.html, and the image shown on the page, iisstart.png. This is where you’ll save your first web page.
- Open Notepad as administrator. To save to the wwwroot location, you must be an administrator.

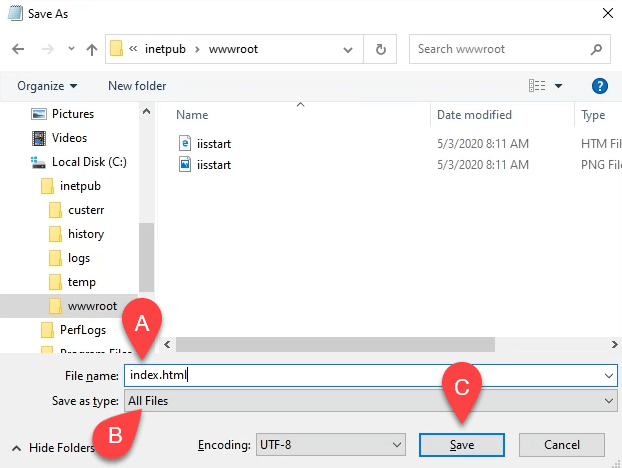
- Save the file to the wwwroot location. Name it index.html and change the Save as type: to All Files. Then click the Save button.
- Now that it’s saved as the right filetype, let’s put some content in it. Enter the following HTML code for a very basic web page and save it:
<html>
<body>
<h1>Hello World!</h1>
</body>
</html>
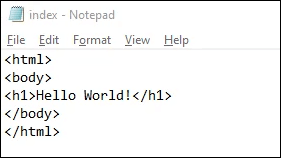
- Go back to the web browser that has the default IIS web page. Click on the refresh button. You will now see your first web page.

That’s it! You’ve just created and published your first website on IIS.
Install IIS Using Windows Commands
We can reduce the process of installing IIS to a one-line command. It can be done in either Windows Command Prompt or using PowerShell. We’ll show you how to do it with Windows command first, but learning PowerShell would be of great benefit in the future.
- Type cmd in the search bar and the top result should be Command Prompt. Click on Run as administrator.
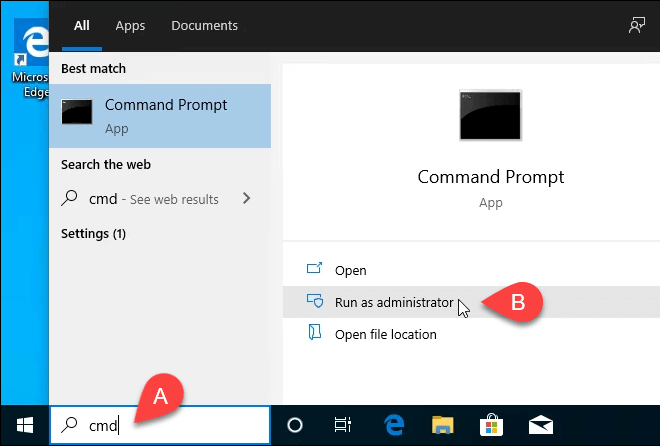
- Type in the command DISM /online /enable-feature /featureName:IIS-DefaultDocument /All and press Enter.

- You’ll see a progress bar appear. Once it reaches 100.0% and you see the message, “The operation completed successfully.” you can close the Command Prompt. IIS is installed.
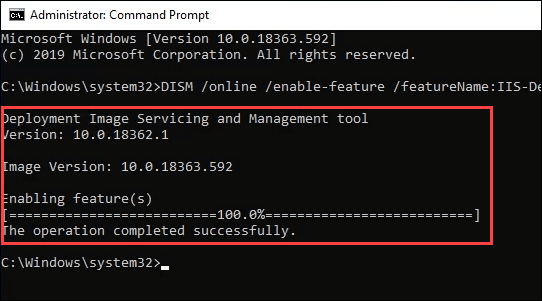
- Check to ensure you can open the IIS Manager and that the installation worked, using steps 4-7 from the Install IIS Using The GUI section.
Install IIS Using PowerShell
Learning to do things like installing IIS in PowerShell is a huge benefit for two reasons. One, it’s the easiest and fastest way to do most administrative tasks in Windows. Two, you can save your PowerShell commands, known as cmdlets, as a script and run them anytime on any Windows computer or server.
- Type powershell in the search bar and one of the results should be PowerShell ISE. Click on Run as administrator.
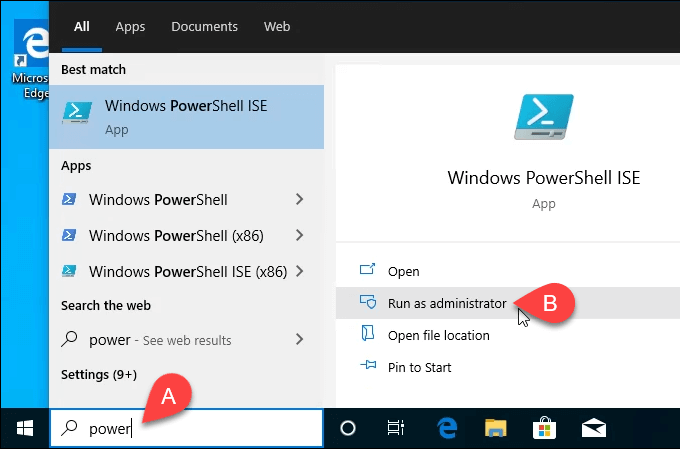
- Type the cmdlet Enable-WindowsOptionalFeature -Online -FeatureName IIS-WebServerRole -NoRestart and run it. You’ll see a progress bar start. Once it’s complete, check to make sure IIS is installed and working.
- This step is optional, but you can save this as a PowerShell script and then run it anytime. Work with the script and add different parameters. Eventually, you’ll have an IIS install script that sets things up exactly as you want it, every time, with a single click.
You’re The Web Now!
This is just the beginning of what you can do with making your own website in IIS. Look into using IIS for FTP file transfer or media hosting as well. Also, look into Microsoft’s Web Platform Installer for simplified ways to install and learn things like WordPress, PHP, Python, and more.


