Media Creation Tool’s 0x80072f8f – 0x20000 error prevents you from launching the tool and creating your bootable Windows drive. Many items can lead the Media Creation tool or your system to report this error. Your tool may be lacking the required permissions to run, or your computer may have a system issue. Regardless, we’ll show you how to fix this problem on your Windows 11 or Windows 10 PC.
If you’re curious to know what’s causing Media Creation Tool not to run, some reasons are that your computer isn’t compatible with the operating system you want to install, your antivirus program has blocked your access to the tool, your disk doesn’t have enough free space to accommodate the tool’s downloaded files, and more.
Resolve Your Internet Connection Issues
As you know, Media Creation Tool utilizes your computer’s internet connection to download the required operating system files. If your internet connection isn’t working or is unstable, that may be why you have trouble using the tool.
In this case, check and fix issues with your internet connection before running the tool. You can find out if your connection is faulty by opening a web browser and launching a site. Your site won’t load if your connection has issues.
You can try to resolve your connection problems by giving your router a reboot, using an Ethernet connection instead of a wireless one, rejoining your Wi-Fi network, or contacting your internet service provider (ISP).
Ensure Your Computer Meets Your OS’ Minimum System Requirements
If you’re trying to upgrade your current Windows version, ensure your computer meets at least the minimum system requirements of the Windows version you’re upgrading to. If your computer doesn’t meet the target operating system’s requirements, you can encounter issues.
Here are Windows 10’s minimum requirements:
- You must be running the latest version of your current operating system
- Have a 1 GHz or faster processor
- Have 1 GB RAM for 32-bit and 2 GB RAM for 64-bit Windows 10 version
- Have 16 GB disk space for 32-bit and 20 GB disk space for 64-bit Windows 10 version
- DirectX 9 or later with WDDM 1.0 driver
- Display resolution of 800 x 600 pixels
If you’re upgrading to Windows 11, your system must meet the following requirements:
- 1 GHz or faster processor with two or more cores
- 4 GB RAM
- 64 GB disk space
- Graphics card compatible with DirectX 12 or later with WDDM 2.0 driver
- System firmware compatible with UEFI and Secure Boot
- TPM 2.0
- 720p display
Check your computer’s current specifications and ensure they meet the minimum requirements of the Windows version you want to install.
Run the Media Creation Tool as an Admin
If your internet connection is working and your computer meets the minimum requirements for the Windows version you want to run, run the Media Creation Tool with administrative privileges and see if that fixes your issue.
That’s because the tool may be lacking the permissions to run required tasks, leading to an error message. Running the tool as an admin gives it all the rights it needs.
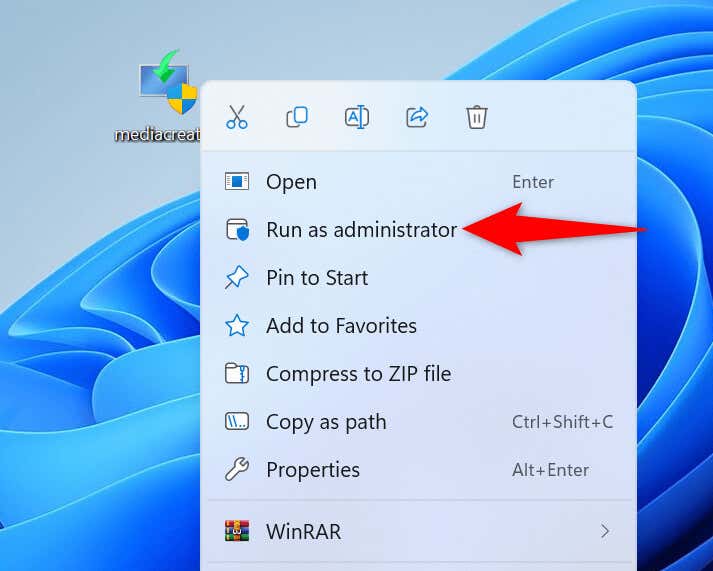
- Find your Media Creation Tool.
- Right-click the tool and choose Run as administrator.
- Select Yes in the User Account Control prompt.
Use Another Port on Your Computer
If you’re trying to create a bootable USB flash drive, ensure your drive is plugged into a working port on your computer. The current port you use with your USB drive may not be working, causing interruptions in Media Creation Tool’s working.
You can fix that by unplugging your USB drive from the current port and plugging the device into another port on your computer. Once you’ve done that, run the Media Creation Tool to make your bootable drive.
Turn Off Your Computer’s Antivirus Program
One reason Media Creation Tool fails to launch is that your antivirus program has blocked your access to the tool. This happens when your antivirus recognizes your file as a potential threat.
If you’ve downloaded the tool from the official Microsoft website, you can temporarily turn off your antivirus protection to run the tool and perform your tasks. However, if you’ve obtained the tool from elsewhere, your tool may indeed have a virus or malware. In this case, delete the tool from your computer immediately and download the tool from the official Microsoft website.
To turn off your antivirus protection in Microsoft Defender Antivirus:
- Launch the Windows Security app on your PC.
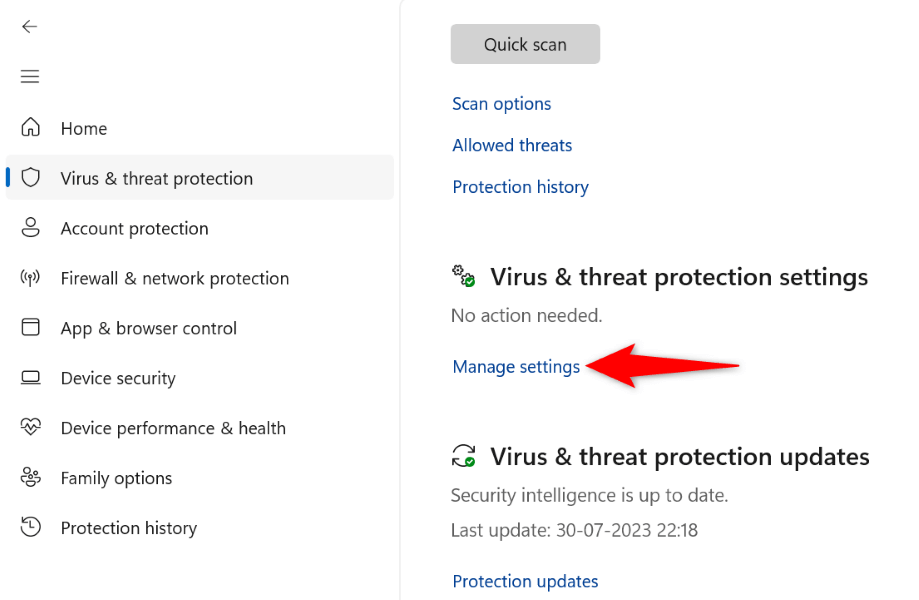
- Select Virus & threat protection in the app.
- Choose Manage settings under the Virus & threat protection settings header.
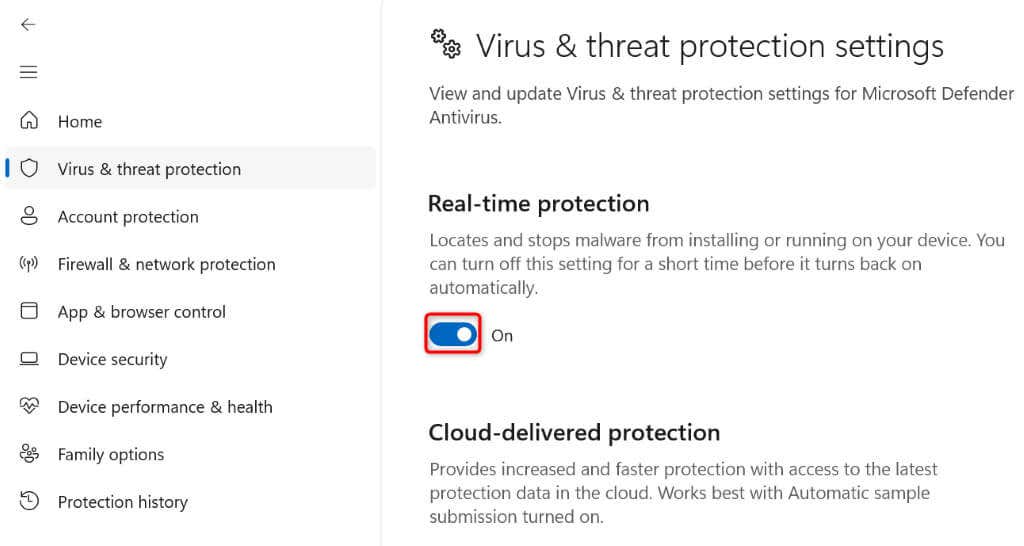
- Turn off the Real-time protection option.
- Select Yes in the User Account Control prompt.
- Launch your Media Creation Tool.
Make sure to turn your antivirus protection back on when you’ve finished your tasks with the Media Creation Tool. This is to ensure your PC remains protected from any threats.
Delete All Files in the SoftwareDistribution Folder
SoftwareDistribution is the folder on your PC where Windows downloads and saves your Windows Update files. Sometimes, this update cache becomes corrupted, causing various issues on your computer.
Your Windows system may be trying to install all the available updates from this folder before allowing you to upgrade your Windows version. Since this update cache is corrupted, your update process is failing, leading to various errors.
You can fix that by deleting all the contents of the SoftwareDistribution folder on your PC. This doesn’t delete your personal data.
- Open the Start menu, find Command Prompt, and select Run as administrator.
- Choose Yes in the User Account Control prompt.
- Type the following command in CMD and press Enter. This command stops the Windows Update process. Keep the CMD window open as you’ll return to this window shortly.
net stop wuauserv
- Open the Run dialog box by pressing Windows + R.
- Type the following path in Run and press Enter: C:\Windows\SoftwareDistribution
- Select all files in the folder by pressing Ctrl + A.
- Right-click a selected file and choose Delete (a trash can icon).
- Return to the CMD window, type the following command, and press Enter. This command starts the Windows Update service: net start wuauserv
- Run your Media Creation Tool.
Free Up Disk Space on Your Windows PC
Since Media Creation Tool downloads and saves huge files on your system, you must have adequate free disk space available to accommodate those files. If you’re running low on disk space on your PC, free up some space to store the tool’s files.
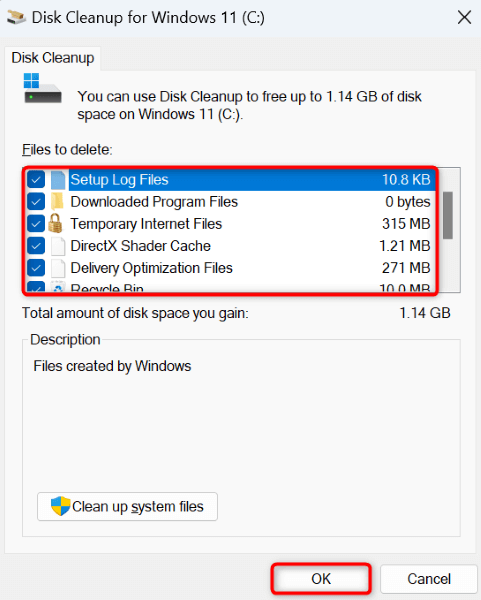
There are various ways to free up a Windows PC’s disk space. You can manually find and delete unwanted large files from your storage or use a built-in utility called Disk Cleanup to remove junk files from your system automatically.
Here’s how to use the latter method:
- Open Start, find Disk Cleanup, and run the utility.
- Select your operating system drive in the drop-down menu and choose OK.
- Select the files you want to remove in the Files to delete section.
- Choose OK at the bottom.
- Select Delete Files in the prompt to start removing your selected files.
Enable TLS Versions on Your Windows PC
One item that can cause issues with Media Creation Tool and lead to a 0x80072f8f – 0x20000 error is the deactivation of various TLS (Transport Layer Security) options on your PC. You can enable all the available TLS options to possibly fix your issue.
- Open Run by pressing Windows + R.
- Type the following command in Run and press Enter: inetcpl.cpl
- Access the Advanced tab in the open dialog box.
- Enable the Use TLS 1.0, Use TLS 1.1, Use TLS 1.2, and Use TLS 1.3 options.
- Select Apply followed by OK at the bottom to save your changes.
Enable OS Upgrade in Your Windows Registry
It’s possible the operating system upgrade option is disabled in your Windows registry, preventing you from upgrading your Windows version. In this case, you can tweak your registry to allow OS upgrades on your machine.
- Open Run by pressing Windows + R, type the following in the box, and press Enter:
regedit - Select Yes in the User Account Control prompt.
- Navigate to the following path in Registry Editor:
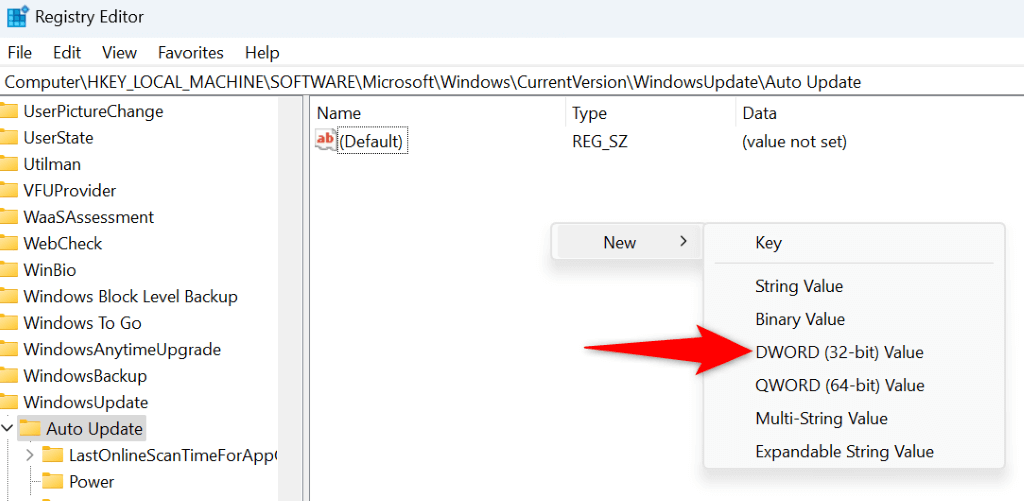
Computer\HKEY_LOCAL_MACHINE\SOFTWARE\Microsoft\Windows\CurrentVersion\WindowsUpdate\Auto Update - Right-click anywhere blank on the right pane and choose New > DWORD (32-bit) Value.
- Use AllowOSUpgrade as the entry name.
- Double-click the entry, enter 1 in the Value data field, and select OK.
- Close Registry Editor.
- Restart your computer and run Media Creation Tool.
Clean Boot Your Windows PC
If your Media Creation Tool still doesn’t run, a third-party app installed on your PC may be causing the issue. This app may be interfering with the tool’s working, causing the tool not to launch or not work as expected.
In this case, you can clean boot your Windows PC, which prevents your third-party apps from running. This helps you verify if a third-party item is causing your apps not to function. You can check out our guide on that topic to learn how to perform the procedure.
Troubleshooting a Media Creation Tool Error 0x80072f8f – 0x20000
Not being able to run Media Creation Tool means not being able to create a bootable drive for your favorite Windows version. There are various items that can prevent this tool from running or functioning, as explained above.
Once you go in and fix those items, the tool will start working just as it should, letting you create all kinds of supported bootable drives. Enjoy!


