Microsoft OneNote is a powerful digital note-taking app that helps you stay organized, collaborate, and improve productivity. OneNote lets you capture ideas, create to-do lists, and even collaborate with others in real-time. Whether you’re a student, professional, or an everyday user looking to streamline your note-taking process, OneNote has many features to cater to your needs.
In this comprehensive guide, we will explore the ins and outs of OneNote, from navigating the interface to creating and managing notebooks, sections, and pages. Let’s equip you with the knowledge to effectively use OneNote and boost your productivity.
Navigating the OneNote Interface
The OneNote interface is designed to make your note-taking experience seamless. Here are the key components of the interface.
Notebooks, Sections, and Pages
OneNote organizes notes into a hierarchical structure, with notebooks at the top level, sections within notebooks, and pages within sections. This structure allows you to categorize and find your notes more easily.
- Notebooks: These function as digital binders, collecting related notes and materials. You can create multiple notebooks for various purposes, such as work, school, or personal projects.
- Sections: Sections divide notebooks into smaller, topic-specific categories. For example, you can create sections for meetings, projects, and research within a work notebook.
- Pages: Pages are where you create and store your notes. They can be organized within sections and contain text, images, audio, video, and other elements.
The Ribbon
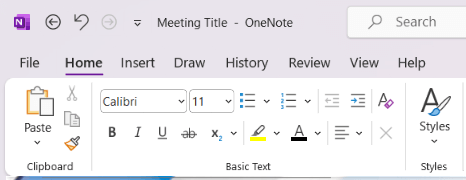
The Ribbon toolbar provides quick access to various OneNote features, like formatting options, tags, and multimedia tools. It is divided into several tabs (Home, Insert, Draw, etc.), each containing relevant tools and commands.
Quick Access Toolbar
Located at the top of the OneNote window, the Quick Access Toolbar contains commonly used commands, such as Undo, Redo, and New Page. You can customize the toolbar by adding or removing buttons based on your preferences and workflow.
Creating and Managing Notebooks
Effectively managing your notebooks is essential for keeping your notes organized and easily accessible. Here’s a closer look at how to create and manage notebooks in OneNote.
Creating a New Notebook
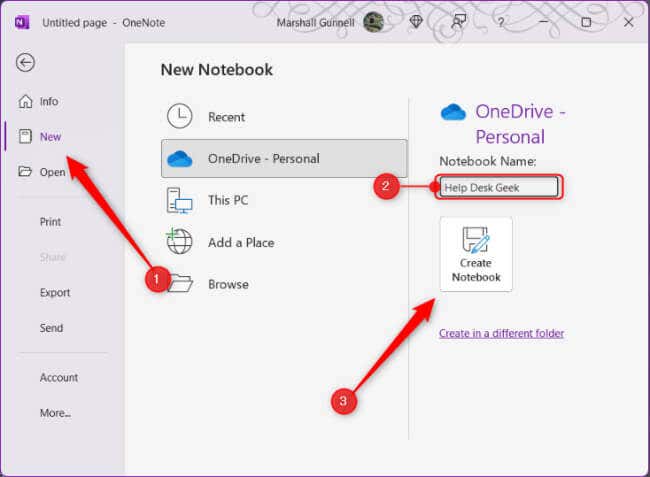
Here’s how to create a new Notebook.
- Click the File tab in the Ribbon.
- Select New from the left-hand pane.
- Pick a location to save the Notebook and then enter a descriptive name for it under Notebook Name.
- Select Create Notebook.
Your new notebook will now be accessible from the list of notebooks in OneNote.
Organizing and Renaming Notebooks
Over time, you may accumulate several notebooks, which makes it important to keep them organized. To rearrange your notebooks, click and drag them to the desired position in the list.
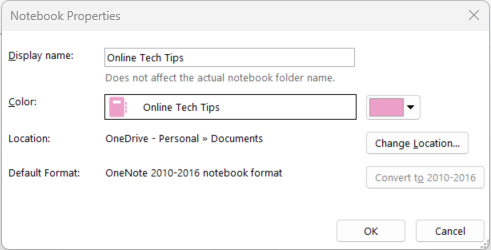
You’ll need to find the Notebook in the location you stored it when you created it to rename it, as you can’t do it directly from OneNote. You can change the display name of the Notebook by right-clicking the Notebook’s name, selecting Properties, and then changing the name next to Display Name. However, this doesn’t affect the actual name of the Notebook folder.
Keeping your Notebooks organized and properly labeled will help you quickly locate the necessary information.
Sharing and Collaborating on Notebooks
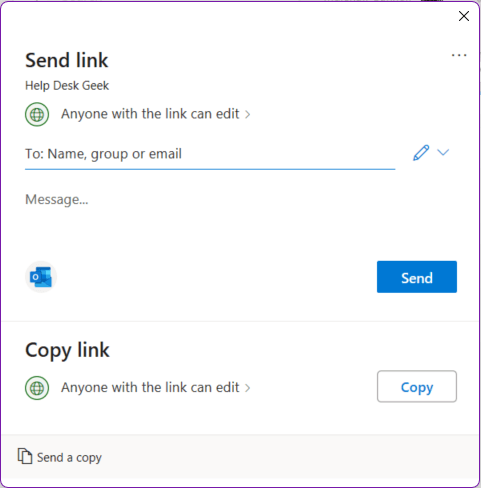
OneNote allows you to share your Notebooks with others and collaborate in real time. Here’s how to share a Notebook.
- Select File from the Ribbon.
- Click Share in the left-hand pane.
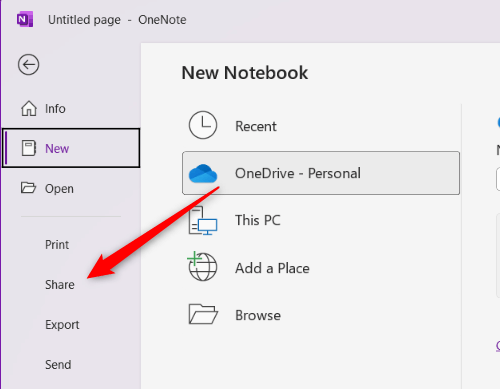
- Choose your sharing options (view-only or editable access). You can share the notebook via a link or send invitations to specific people by entering their email addresses.
Collaborators can then view, add, edit, or delete notes (depending on the permissions given) in the shared notebook.
Creating and Managing Sections
Sections in OneNote help divide your Notebook into organized, topic-specific categories. Learning to create and manage sections effectively is important for staying organized.
Creating a New Section
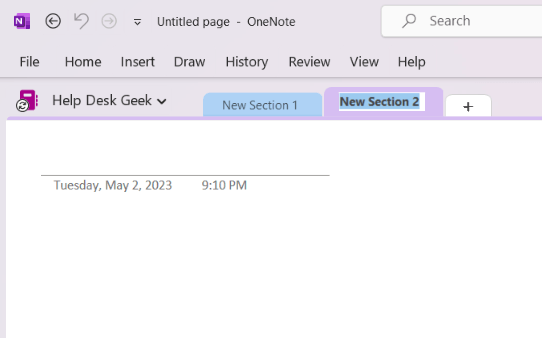
To create a new section within a notebook, click the + icon next to the existing Section tab. You can then type the name for your new section, which should be descriptive of its content.
Organizing and Renaming Sections
As you accumulate more sections within a notebook, you must keep them organized for easy navigation. You can rearrange your sections by clicking and dragging the section tabs to the desired position.
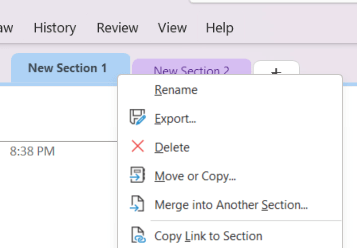
To rename a section, right-click the Section tab, select Rename, and then type the new name.
Keeping your sections organized and properly labeled ensures you can quickly access the necessary information.
Section Groups
For more complex projects or when dealing with many sections, section groups can help you maintain organization. Section groups are folders that can contain multiple sections. Here’s how to create a Section group.
- Right-click the space in the Section tabs area and select New Section Group from the context menu.
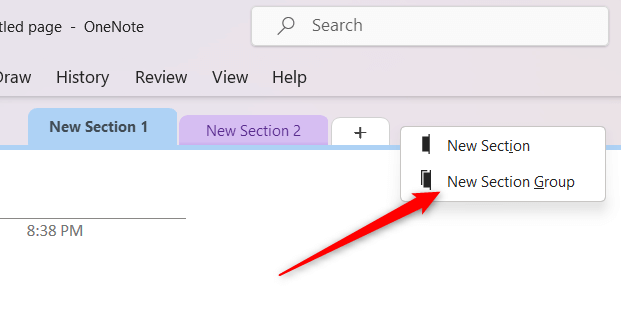
- Name your Section group and then drag and drop existing Sections into the group, or create new Sections within the group.
This feature helps maintain a clean and clutter-free workspace while providing an additional layer of organization.
Creating and Managing Pages
Pages in OneNote are where you create, store, and organize your notes.
Creating a New Page
You’ll create a new Page within a Section. Here’s how.
- Click the Add Page button in the right-hand pane.
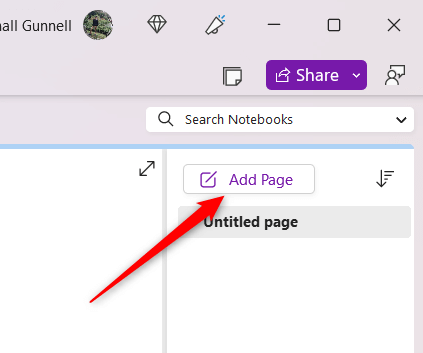
- A new Page will appear in the list, and you can immediately start typing to name the Page. Choose a descriptive name for your Page that reflects its content so you can easily identify it later.
Organizing and Renaming Pages
You’ll need to prioritize organizing your Pages for easy navigation, especially as your collection grows. You can rearrange Pages by clicking and dragging them within the list to the desired position.
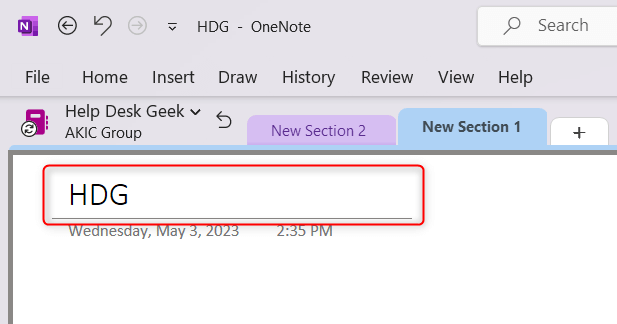
To rename a Page, click its title at the top of the Page and edit the text, or right-click the Page’s name in the list and select Rename.
Page Templates
OneNote offers a variety of built-in page templates to help you create consistent and visually appealing notes.
- To access Page templates, click the Insert tab and select Page Templates from the Ribbon.
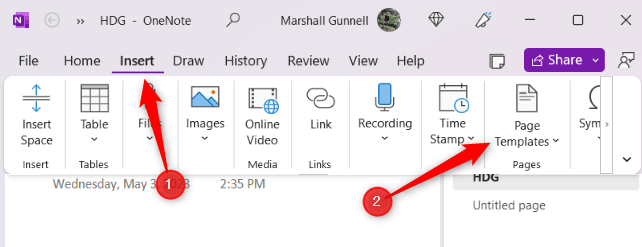
- A pane will appear to the right, displaying a range of templates organized by category, like academic, business, or decorative. Click a template to apply it to the Page.
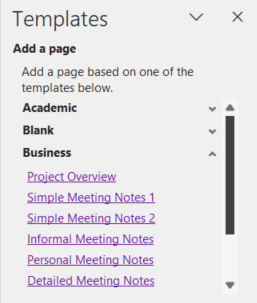
You can also create custom templates by designing a page and then saving it as a template. This feature helps save time and maintain a uniform note-taking style.
Taking Notes in OneNote
OneNote offers several note-taking options, like text notes, drawings, audio and video clips, and handwriting.
Text Notes
You can create text-based notes in OneNote by simply clicking anywhere on a Page and typing. OneNote supports rich-text formatting, which lets you change font styles, sizes, colors, and other attributes. You can also create bulleted or numbered lists and format text with bold, italics, or underlining.
Handwriting and Drawing
OneNote also supports digital handwriting and drawing using a stylus, touchscreen, or mouse.
To access this feature, click the Draw tab in the Ribbon and choose from various pen styles, colors, and thicknesses.
You can write or draw directly on the page, making it ideal for annotating, sketching ideas, solving equations, and more.
Audio and Video Recordings
OneNote allows you to record audio or video notes, which can be especially useful for capturing lectures or meetings.
To create a recording, click the Insert tab in the Ribbon and select Record Audio or Record Video. Note that the Record Audio option is nested under the Transcribe option.
The recording will be embedded in the Page, and you can play it back directly within OneNote.
Screen Clippings
You can capture and insert screen clippings (images of your computer screen) directly into your Notes, as well.
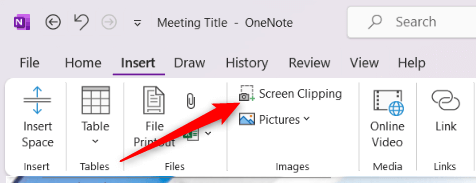
To create a screen clipping, click the Insert tab in the Ribbon and select Screen Clipping.
Your screen will dim, allowing you to select the area you want to capture. The clipped image will then be inserted into your OneNote Page, where you can resize or annotate it as needed.
Formatting and Organizing Notes
OneNote offers various formatting and organizational tools to help you create clean, visually appealing, and easily navigable Notes. Here’s an overview of some key formatting and organizational features you can expect to find.
Text Formatting Options
OneNote supports rich-text formatting, allowing you to change font styles, sizes, colors, and other attributes to suit your preferences. You can format text with bold, italics, underlining, highlighting, and more.
To access these options, select the text you want to format and choose the desired formatting options from the Home tab in the Ribbon.
Bulleted and Numbered Lists
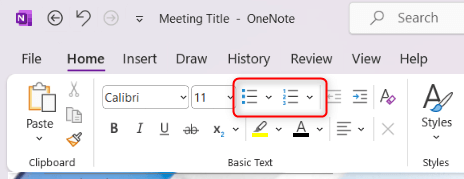
Creating bulleted or numbered lists in OneNote is easy. Click the desired location on a Page and then select either the Bullets or Numbering icon from the Home tab in the Ribbon.
You can choose from different bullet styles or numbering formats to customize the appearance of your lists.
Tables
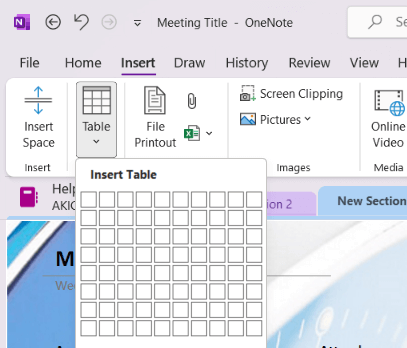
You can create tables to organize information in a structured format. To insert a table, click the Insert tab in the Ribbon and select Table. Next, choose the number of rows and columns you need from the grid to add the table to your page.
You can add or delete rows and columns, apply table styles, and sort data as needed.
Tags
Tags in OneNote help you categorize and prioritize information within your Notes, making it easier to locate specific items later.
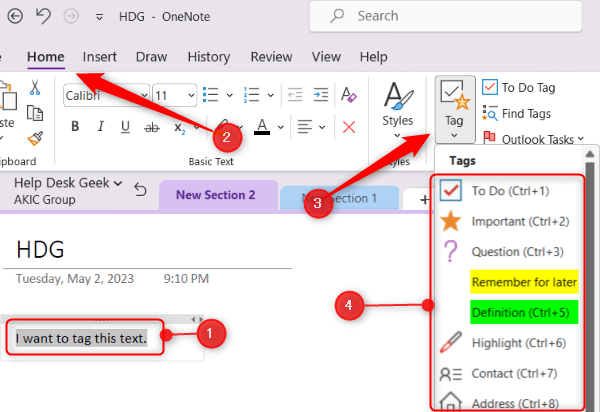
To add a tag, select the text you want to tag and click on the Tags option in the Home tab of the Ribbon. Choose from a variety of built-in tags, like “To Do,” “Important,” or “Question.”
You can also create custom tags to suit your specific needs.
You can search for tagged items later via the Find Tags button in the Home tab. A pane displays a list of all tagged items in your Notes.
Integrating OneNote with Other Microsoft Products
OneNote integrates seamlessly with other Microsoft apps, streamlining your workflow. Here’s an overview of how OneNote works with some key Microsoft products.
Microsoft Word
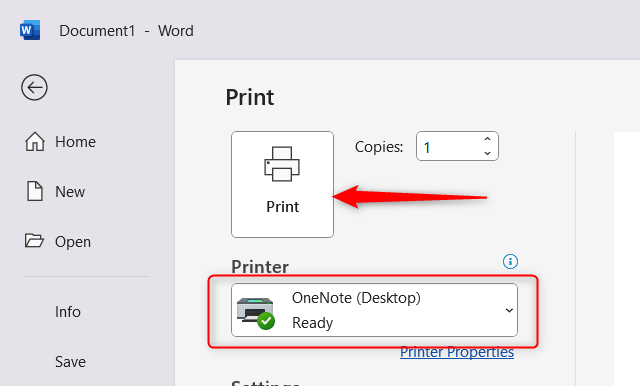
You can send content from a Word document to OneNote by using the Send to OneNote option. To access this option, click File > Print. Select OneNote as your printer and select Print.
You’ll then need to select the Notebook you want to send it to.
This feature allows you to store research, ideas, or outlines in OneNote alongside your other Notes.
Microsoft Excel
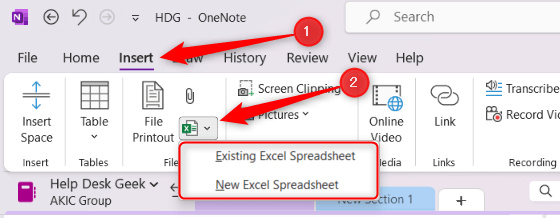
OneNote allows you to embed Excel spreadsheets directly into your Notes.
To do this, click the Insert tab in the Ribbon and select New Excel Spreadsheet or Existing Excel Spreadsheet.
The spreadsheet will be embedded as an object, and you can click Edit in the embedded spreadsheet to edit the content using Excel. You can also create a new table in OneNote and convert it into an Excel spreadsheet by right-clicking it and selecting Convert to Excel Spreadsheet.
Microsoft Outlook
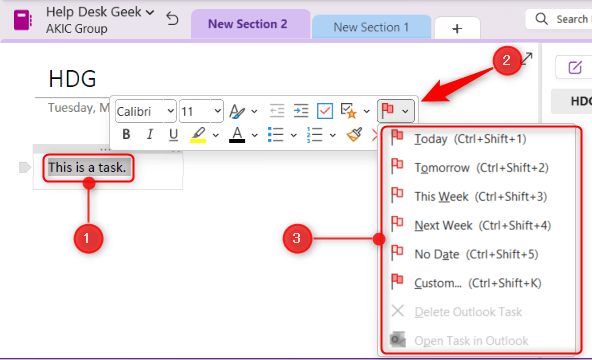
OneNote offers several integration features with Outlook, making managing tasks, appointments, and emails easy. You can create Outlook tasks from within OneNote, which will be automatically added to your Outlook task list.
To do this, select the text you want to turn into a task, right-click, and select the Outlook Tasks option, which is a flag icon. Next, choose a deadline from the list.
OneNote Tips and Tricks
OneNote is a feature-rich application with numerous tips and tricks that can help you maximize its potential and boost your productivity. Here are some useful tips and tricks to consider when using OneNote:
Keyboard Shortcuts
OneNote has several keyboard shortcuts that can save time and streamline your workflow. Familiarize yourself with shortcuts for common tasks, such as creating a new Page (Ctrl + N), undoing an action (Ctrl + Z), or searching for Notes (Ctrl + E). You can find a list of OneNote keyboard shortcuts on Microsoft’s official website.
Optical Character Recognition (OCR)
OneNote has a built-in OCR feature that allows you to extract text from images or scanned documents. To use OCR, right-click on an image within your Notes and select Copy Text from Picture. OneNote will extract the text, which you can then paste elsewhere in your notes or into another app.
Password Protection
You can add password protection to specific Sections within your OneNote Notebooks to keep sensitive information secure. To do this, right-click on a section tab and select Password Protect This Section. Click Set Password, enter the desired password, and confirm it to apply the password protection.
Dock OneNote to the Desktop
You can dock OneNote to the side of your desktop, allowing you to take Notes while simultaneously working on other things. To do this, click the View tab in the Ribbon and select Dock to Desktop. OneNote will resize and dock to the side of your screen, making it easy to reference and take notes while working in other programs.
Unlock Your Productivity
As you master the many features of Microsoft OneNote, you’ll unlock the full potential of this powerful app. From organizing your thoughts to collaborating with others, OneNote allows you to streamline your productivity and keep everything in one easily accessible location.
Don’t be afraid to explore the various customization options and experiment with different techniques to find the perfect workflow for your needs. Remember, OneNote is designed to adapt to your unique style, so make the most of its capabilities to create a personalized digital notebook that works for you.
Happy note-taking!


