Plus how to reformat the data in the process
Text based data files are one of the most common methods of storing data in the world today. This is because text files, in general, consume the last space and they’re easiest to store. Thankfully, it’s very easy to insert either CSV (comma separated values) or TSV (tab separated values) files into Microsoft Excel.
If you want to insert CSV or TSV into an Excel worksheet, you only need to know specifically how the data in the file is separated. You don’t necessarily have to know the details about the data, unless you want to reformat those values into strings, numbers, percentages and more.

In this article you’ll learn how to insert either a CSV or TSV file into your Excel worksheet and how to reformat that data in the process of importing, to save yourself some time.
How To Insert A CSV File Into An Excel Worksheet
Before you can insert a CSV file into your Excel worksheet, you need to confirm that the data file is actually comma separated (also known as “comma-delimited”).
Verify It’s A Comma Separated File
To do this, open Window Explorer and navigate to the directory where the file is stored. Select the View menu and make sure the Preview pane is selected.

Then, select the file that you believe contains comma separated data. You should see a comma between each piece of data in the text file.
The example below comes from a government dataset containing 2010 SAT College Board student score results.

As you can see, the first line is the header line. Each field is separated by a comma. Every other line after that is a line of data, with each data point separated by a comma.
This is an example of what a file with comma separated values looks like. Now that you’ve confirmed the formatting of your source data, you’re ready to insert it into your Excel worksheet.
Insert A CSV File Into Your Worksheet
To insert the source CSV data file into your Excel worksheet, open a blank worksheet.
- Select Data from the menu
- Select Get Data from the Get & Transform Data group on the ribbon
- Select From File
- Select From Text/CSV
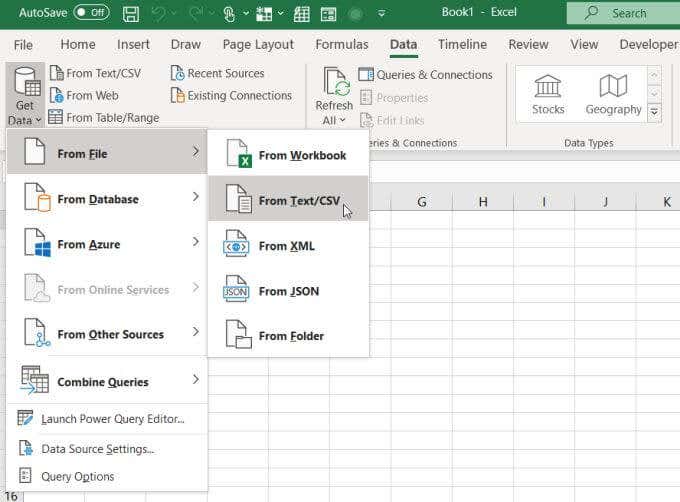
Note: As an alternative, you could also select From Text/CSV directly on the ribbon.
This will open the file browser. Browse to where you’ve stored the CSV file, select it, and select Import.

This will open the data import wizard. Excel analyzes the incoming data and sets all of the dropdown boxes according to the format of the input data file, based on the first 200 rows.
You can adjust this analysis by changing any of the following settings:
- File Origin: If the file is of another data type like ASCII or UNICODE, you can change that here.
- Delimiter: If semicolons or spaces are used as an alternative delimiter, you can select that here.
- Data Type Detection: You can force Excel to analyze based on the entire dataset rather than just the first 200 rows.
When you’re ready to import the data, select Load at the bottom of this window. This will bring the entire dataset into your blank Excel worksheet.
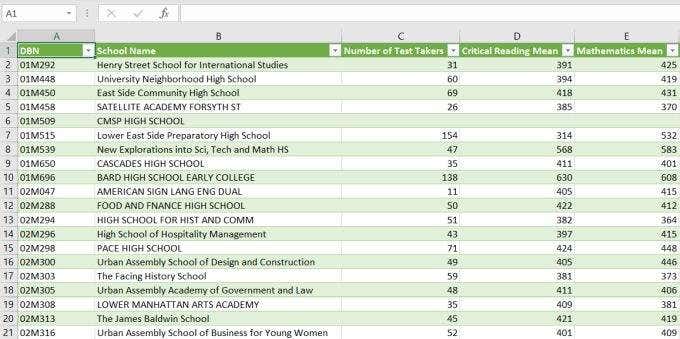
Once you have that data in an Excel worksheet, you can then reorganize that data, group rows and columns, or perform Excel functions on the data.
Import CSV File Into Other Excel Elements
A worksheet isn’t all you can import CSV data into. In the last window, if you select Load To instead of Load, you’ll see a list of other options.
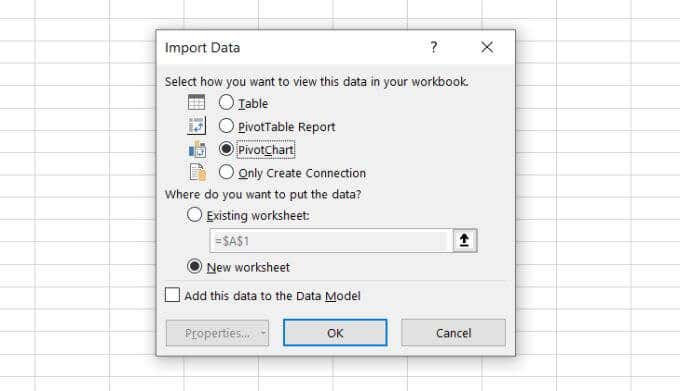
Options in this window include:
- Table: This is the default setting that imports the data into a blank or existing worksheet
- PivotTable Report: Bring data into a Pivot Table report that lets you summarize the incoming data set
- PivotChart: Display the data in a summarized chart, like a bar graph or pie chart
- Only Create Connection: Creates a connection to the external data file, which you can use later to create tables or reports on multiple worksheets
The PivotChart option is very powerful. It lets you skip over the steps of storing the data in a table and then selecting fields to create charts or graphs.
As part of the data import process, you can choose the fields, filters, legends, and axis data to create those graphics in a single step.
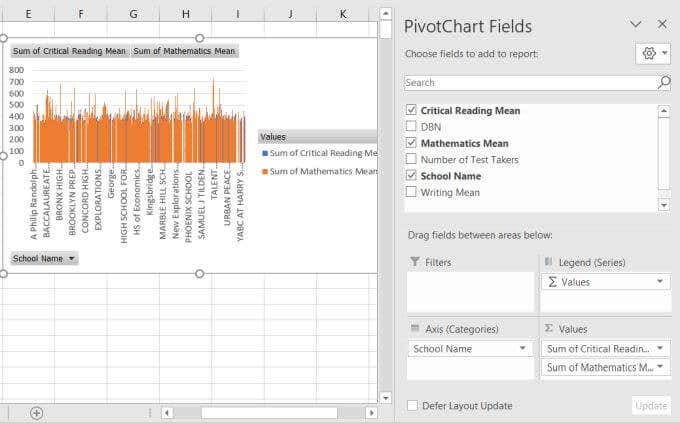
As you can see, there’s a lot of flexibility when it comes to inserting CSV into an Excel worksheet.
How To Insert A TSV File Into An Excel Worksheet
What if your incoming file is tab delimited instead of comma delimited?
The process is mostly the same as in the previous section, but you’ll want to use the Delimiter dropdown box to select Tab.
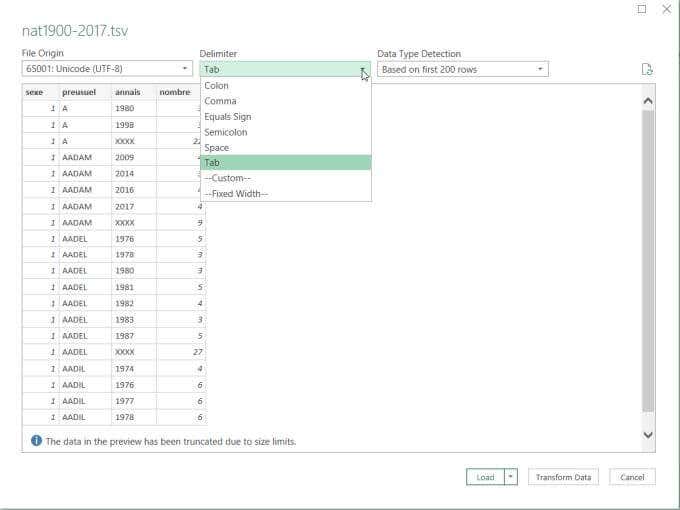
Also, remember that when you’re browsing for the data file, Excel automatically assumes you’re looking for a *.csv file. So in the file browser window, remember to change the file type to All Files (*.*) to see the *.tsv type file.
Once you’ve selected the correct delimiter, importing data into any Excel worksheet, PivotChart, or Pivot Report works exactly the same way.
How Transform Data Works
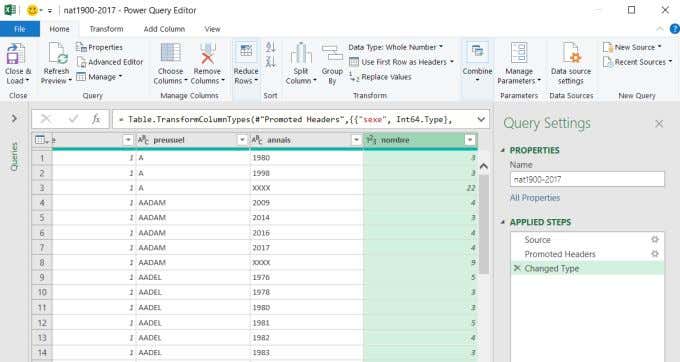
In the Import Data window, if you select Transform Data instead of selecting Load, it’ll open the Power Query Editor window.
This window gives you insight into how Excel automatically converts the data that it’s importing. This is also where you can tweak how that data gets converted during the import.
If you select a column in this editor, you’ll see the assumed data type under the Transform section in the ribbon.
In the example below, you can see that Excel assumed you’d want to convert the data in that column into a Whole Number format.
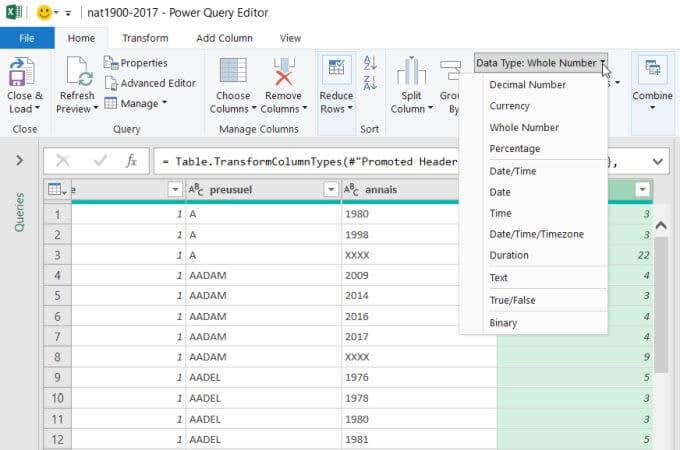
You can change this by selecting the down arrow next to the data type and selecting the data type you prefer.
You can also reorder columns in this editor by selecting a column and dragging it to the position where you want it to go in your worksheet.
If your incoming data file doesn’t have a header row, you can change Use First Row as Headers to Use Headers as First Row.
Normally, you should never have to use the Power Query Editor, since Excel is pretty good at analyzing incoming data files.
However, if those data files are inconsistent in how the data is formatted or you want to reorganize how the data appears in your worksheet, then the Power Query Editor lets you do that.
Is your data in a MySQL database? Learn how to connect Excel to MySQL to bring in that data. If your data is already in another Excel file, there are also ways to merge data in multiple Excel files into one file.


