Is the Wi-Fi option missing from the system tray and Quick Settings pane in Windows 11? Do you also have trouble locating your Wi-Fi preferences within the Settings app? This problem can occur due to several factors, such as a malfunctioning Wi-Fi service, an inactive wireless adapter, or a corrupt Wi-Fi driver.
This troubleshooting guide will teach you how to address various underlying causes and restore access to Windows 11’s Wi-Fi connectivity options.
1. Restart the Wi-Fi Service
Begin by restarting the background service related to wireless internet connectivity in Windows 11. This action is highly effective at resolving technical problems behind Wi-Fi issues. Here’s how:
- Press Windows + R to open Run.
- Type services.msc and press Enter.
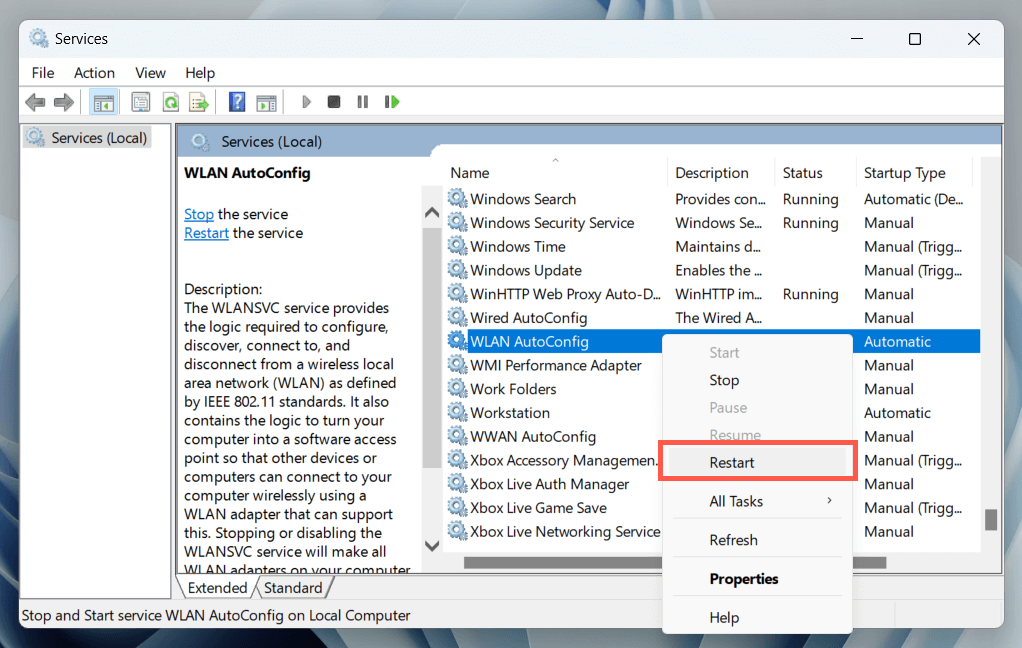
- Scroll down the list of services, right-click WLAN AutoConfig, and select Restart. If the option appears grayed out, choose Start.
Additionally, check if WLAN AutoConfig is configured to run automatically at system startup. To do that, double-click the service and ensure the Startup type drop-down is set to Automatic.
2. Restart Your PC
A system reboot plays a crucial role in clearing out numerous issues caused by unfinalized updates, obsolete temporary data, driver cache corruption, etc. Furthermore, a restart also addresses problems caused by Fast Startup.
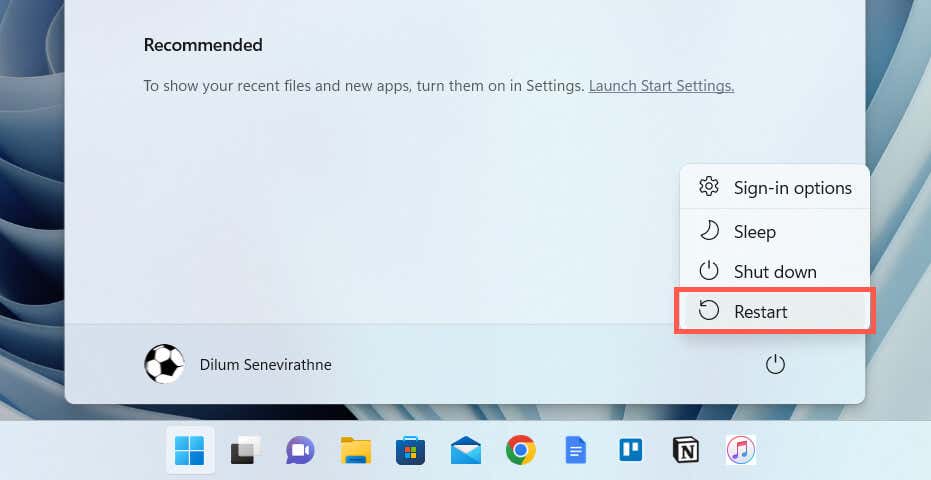
If you haven’t already, open the Start menu and select Power > Restart (or Update and restart if you see it as an available option).
3. Enable the Wi-Fi Adapter
An inactive Wi-Fi adapter is a common reason preventing Windows 11’s Wi-Fi options from showing up. Use the Network Connections Control Panel applet to check and enable it. Here’s how:
- Open a Run box, type ncpa.cpl, and select OK.
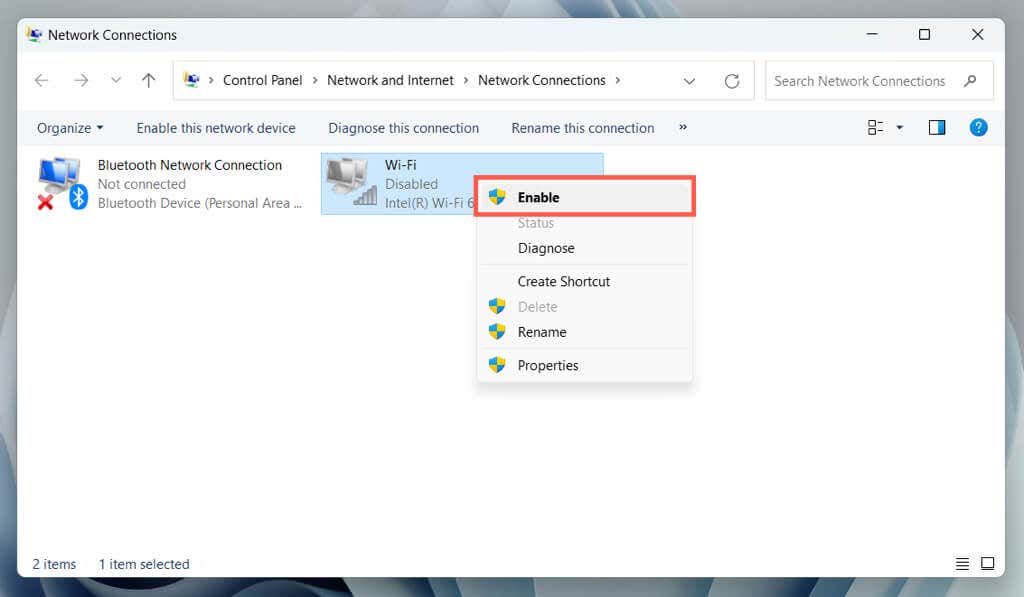
- Right-click the Wi-Fi adapter setting if it’s grayed out.
- Select Enable.
Important: If you use a laptop device, it may have a physical switch—e.g., above the keyboard or the casing’s front or side—that you must turn on to activate the Wi-Fi adapter inside.
4. Check the Group Policy Editor
If you use the Pro edition of Windows 11, the Wi-Fi icon on the system tray and Quick Settings pane may not appear due to a specific policy setting. To check and disable it:
- Press Windows + R, type gpedit.msc, and select OK.
- Navigate to User Configuration > Administrative Templates > Start Menu and Taskbar on the Group Policy Editor’s sidebar.
- Right-click the Remove the network icon policy setting and choose Properties.
- Select Disabled.
- Select Apply > OK.
Note: If Wi-Fi is missing only from Windows 11’s Quick Settings pane (a.k.a. Action Center in Windows 10), you can get it back quickly—just select the pencil-shaped Edit quick settings icon, select Add, and pick Wi-Fi.
5. Run Network Adapter Troubleshooter
Windows 11 has a built-in troubleshooting utility that automatically scans and fixes issues with network adapters. To run it:
- Right-click the Start menu and select Settings.
- Go to System > Troubleshoot.
- Select Other troubleshooters.
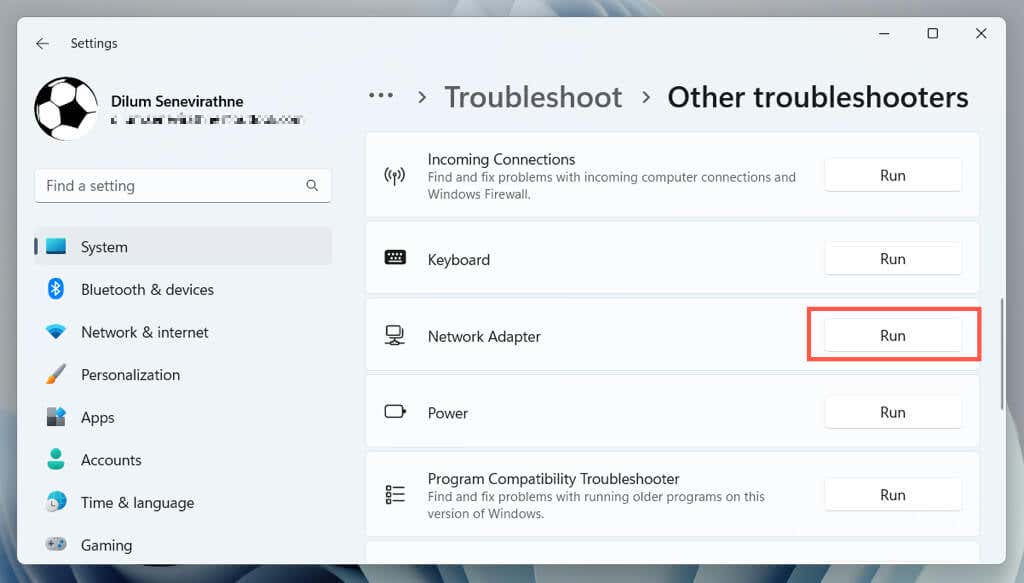
- Select Run next to Network Adapter.
- Follow the on-screen instructions to fix Wi-Fi issues the troubleshooter detects.
6. Update Wi-Fi Drivers and Windows
Next, visit your laptop/motherboard manufacturer’s website (HP, Dell, Acer, etc.), search for newer updates for your network adapter (you can find the model name via the Network Connections applet), and download and run the executable driver file.
Since your computer doesn’t have Wi-Fi connectivity to the internet, you must either:
- Set up a wired Ethernet connection.
- Tether your phone over USB.
- Download the driver file on another PC and transfer it via USB.
While you’re at it, we recommend you update Windows 11 to its latest version—go to Settings > Windows Update and select Check for updates. You can also use the Microsoft Update Catalog to download Windows updates on a device with internet access, copy them to a flash drive, and install the files offline.
7. Reinstall the Network Adapter Drivers
If the missing Wi-Fi problem in Windows 11 persists, remove and re-add the network adapter to rule out issues that stem from driver corruption. To do that:
- Right-click the Start button and select Device Manager.
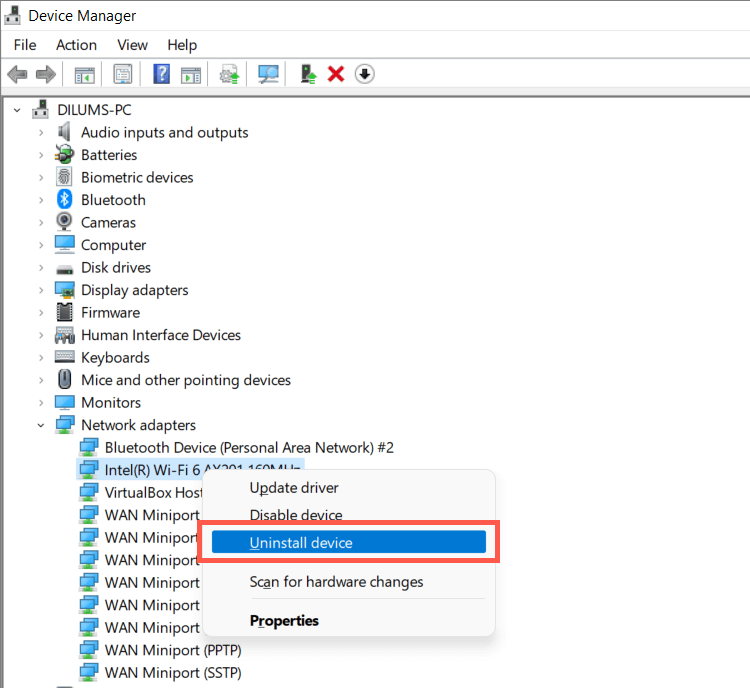
- Expand Network adapters.
- Right-click the Wi-Fi adapter and select Uninstall device.
- Check the box next to Attempt to remove the driver for this device and select Uninstall.
- Restart your computer.
- Re-open the Device Manager and select Action > Scan for hardware changes on the menu bar.
8. Roll Back Wi-Fi Drivers
Roll back your PC’s wireless adapter software to an earlier version if the missing Wi-Fi issue occurs after a recent driver update. To do that:
- Open the Device Manager.
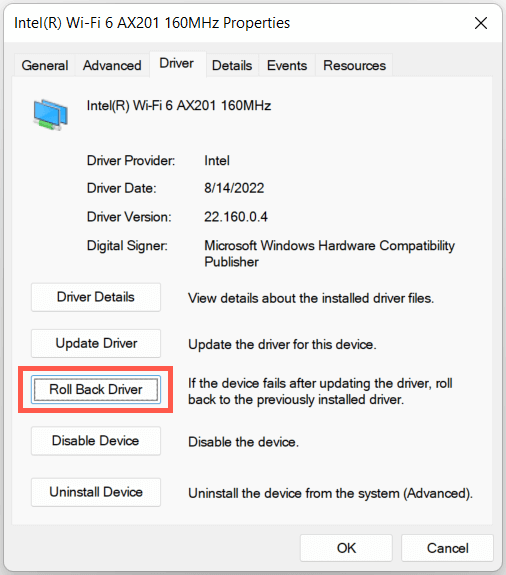
- Expand Network adapters, right-click your wireless adapter, and select Properties.
- Switch to the Driver tab and select Roll Back Driver.
9. Fix Windows File Corruption Issues
The following fix involves using the SFC (System File Checker) utility to scan the operating system for corruption and stability issues. You can run it through an elevated Command Prompt or Windows PowerShell console. Here’s how:
- Open the Start menu, select cmd, and choose Run as administrator. Or, right-click the Start button and select Windows Terminal (Admin).
- Select Yes on the User Account Control dialog.
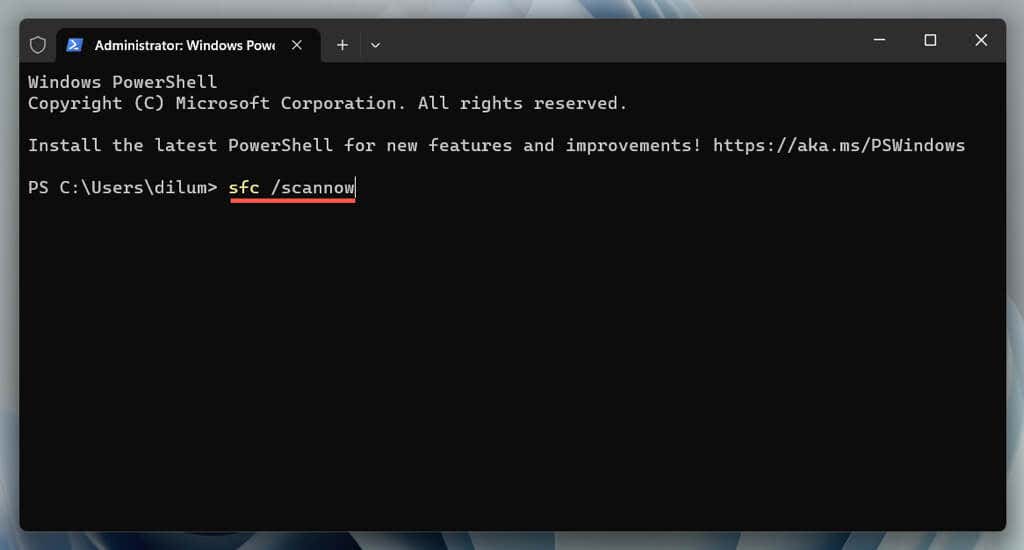
- Execute the following command:
sfc /scannow
Follow up with a DISM (Deployment Image Servicing and Management) scan if the System File Checker encounters an issue it can’t repair.
10. Reset Your PC’s Networking Stack
The TCP/IP stack contains protocols for communication and data exchange between devices on a network. Reset it to its default settings and check if that restores Windows 11’s Wi-Fi options. Here’s how:
- Open an elevated Command Prompt or Windows PowerShell console.
- Execute the commands below in the following order:
ipconfig /flushdns
netsh winsock reset catalog
netsh int ip reset
- Exit the command line and restart your PC.
11. Reset the Network Settings
Resetting Windows 11’s network settings is a last-resort measure that resolves Wi-Fi issues caused by an error-prone networking configuration. The procedure reinstalls all network adapters and restores other wireless/wired components to their original settings.
However, it’s important to note that a network settings reset also removes previously saved wireless networks and passwords. If you want to go ahead:
- Open the Settings app and go to Network and internet > Advanced network settings.
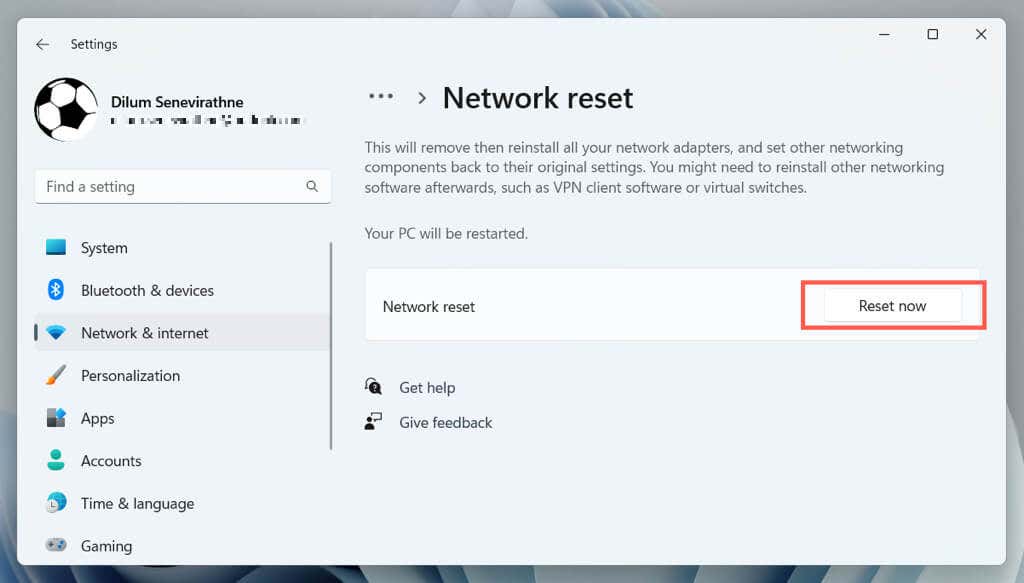
- Select Network reset.
- Select Reset now.
Windows 11 should automatically restart after the reset procedure. If you regain access to your Wi-Fi options, join a Wi-Fi network to get your PC back online.
What Else Should You Do?
If none of the solutions above help restore Windows 11’s missing Wi-Fi options, continue troubleshooting by booting the operating system in Safe Mode. If that fails, back up your data and reset your PC to factory defaults—the process reverts all settings to their defaults and resolves severe issues with core system functionalities.
However, if a factory reset also fails to fix missing Wi-Fi issues, it could indicate defective wireless networking hardware. Seek assistance from a PC support specialist to diagnose the source of the problem.


