Customize in the header, footer, or margin
Page numbers are useful for short papers and essays. They are essential for writing long documents like books and dissertations. If you have a table of contents, page numbering can save you a lot of time and effort in searching for topics and chapters.
Whether you’re using Word or Google Docs, you can add page numbers in different number formats in the header, footer or margin of your document, and then customize them to your liking.
How to Insert Page Numbers in Word on Windows
Note: Instructions to add page numbers in this guide apply to recent Word versions.
On a Windows PC follow the steps below.
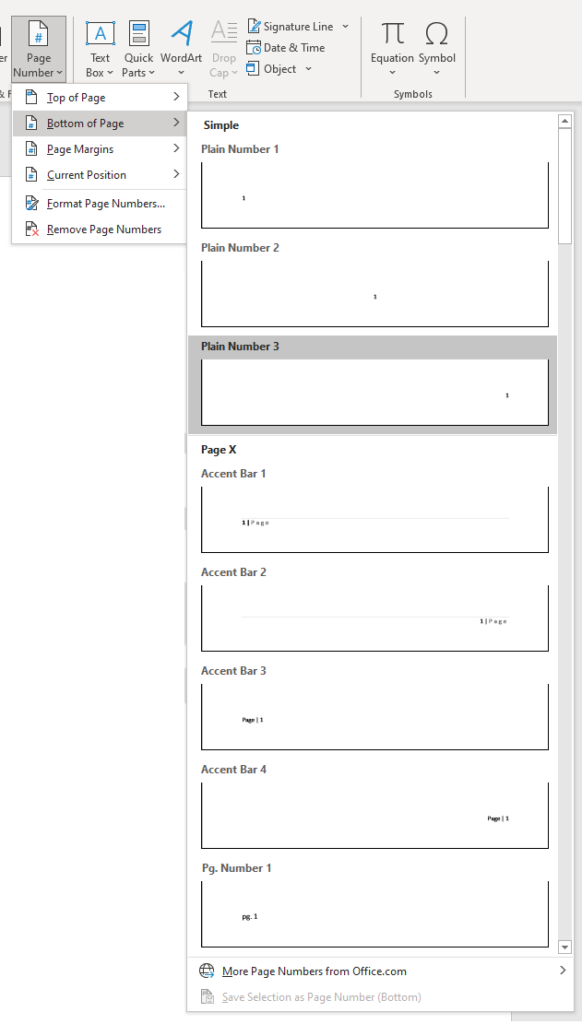
- On the Office ribbon, click Insert > Page Number and then choose the style and location you want; for example, top of the page, bottom of the page, page margins, and current position (for wherever your cursor is).
- For each location, you’ll have a bunch of different options to choose from. The options allow you to adjust the alignment, color options, wording, etc. of the page numbers.
- Press Esc or select Close Header and Footer when you’re done.
- If you need to edit the style or format of the page number, double-click on the number itself in the header or footer and make the necessary adjustments. To change where a page number appears, select the page number in the header or footer. Press the Tab key on your keyboard to position the number right, center or left.
- If you want to see the total number of pages, for example Page 2 of 100, you can do that in the header or footer of your document.
- Repeat Step 1.
- Scroll to the Page X of Y section and choose a format.
- You can also adjust the formatting of the page numbers by going to Insert > Page Number and click on Format Page Numbers.
- You can also double-click the top or the bottom of any page in the Word document to go into Header & Footer editing mode.
- Double-click anywhere outside the header or footer or select Close Header and Footer.
How to Insert Page Numbers in Word on Mac
On a Mac follow the steps below.
- Select Insert > Page Number > Page Number.
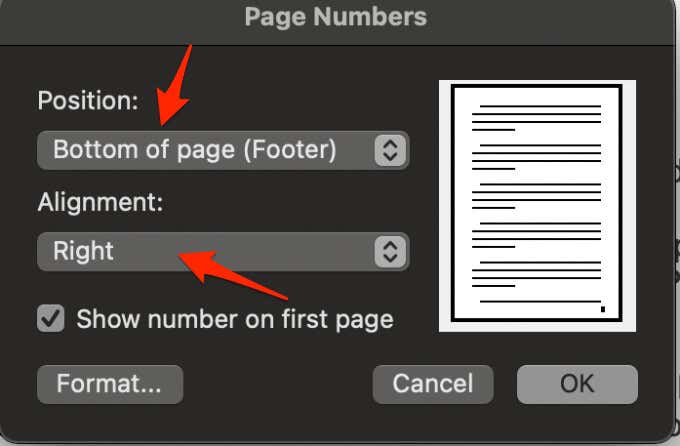
- Select a location and alignment style, and Word will number each page except for the designated title pages.
- Click the Format button to change the numbering style, choose the format you want and select OK twice to exit. You can also choose which page you would like to start the numbering at.
If you need to adjust the position or the format of the page numbers later on, you can do this by double-clicking the top or bottom of the page in Word and then by selecting Header & Footer > Page Number > Page Number or Format Page Numbers.
Double-click outside the header or select Header & Footer > Close Header and Footer to exit.
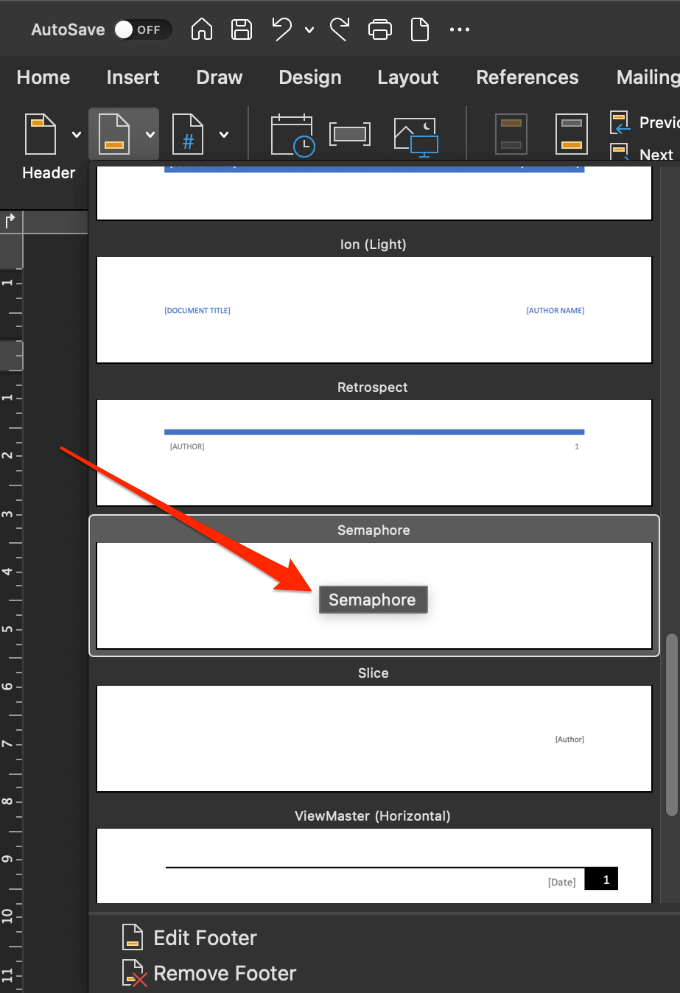
If you want to see the total number of pages like Page 1 of 10, double-click the header or footer, click Header & Footer > Footer > Semaphore, and then double-click the header or footer to exit.
Note: If you don’t see the page numbers you want after inserting them, check if there are any graphics or other elements within the header or footer and move them.
Insert Page Numbers in Word Online (Web Version)
You can insert page numbers in Word Online using the following steps.
- Login with your Microsoft account. If you don’t have an account, you will have to create one.
- Select Insert > Page Numbers and then select where you want the numbers to appear.
Note: To include the total number of pages in Word for the Web, click Insert > Page Numbers > Include Page Count for an X of Y format and select a location.
Note: Select View > Reading View to see your header or footer with page numbers.
Start Page Numbers Later in a Word Document
If you want the page numbers to start on the second or third page instead of page one of your document, you can use the Different First Page option in Word.
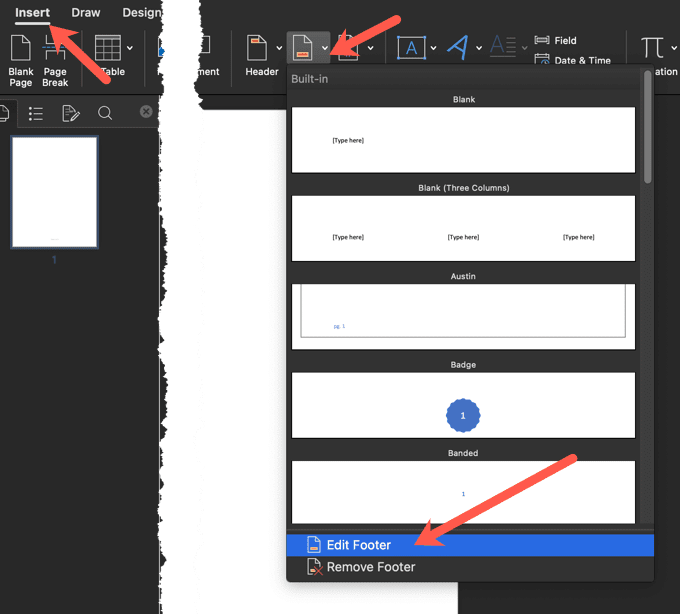
- Select Insert > Header or Footer and then select Edit Header or Edit Footer > Different First Page. You can also just double-click the header or footer in the Word document.
This option not only applies to the very first page but also to the first page of any other section in your document.
- Double-click the header or footer of the first page, select the page number and press Delete.
- To start with number 1 on the second page of your document, select Page Number > Format Page Numbers > Start at and set the value to 0.
- Press Esc or select Close Header and Footer to exit.
Start Page Numbering on the Third Page in Word
If you want to use double-sided printing in Word, the odd-numbered pages will be printed first and then the even-numbered pages on the opposite side of the paper. You can change the settings to start the page numbering at page three.
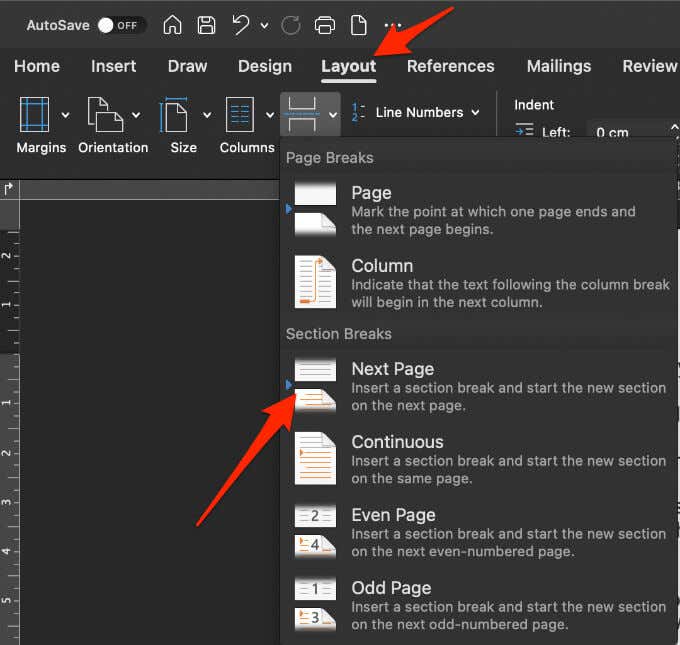
- Select the page where you want the page numbers to begin from and then go to Layout > Breaks > Next Page.
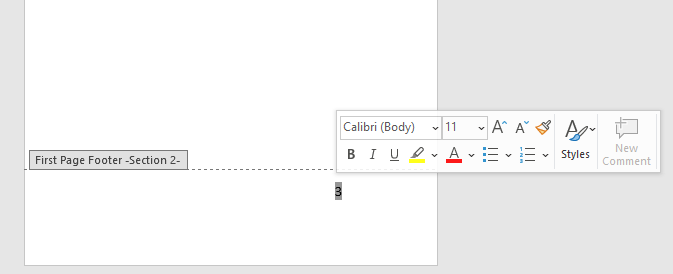
- Double-click in the header or footer on the first header in the section break where you want the numbers to appear and click Link to Previous. Doing this will unlink the header and footer sections so that you can insert the new page number. You’ll notice the “Same as Previous” text will disappear.
- Click Page Number icon > Page Number, choose a location and style for the number.
- Click Page Number icon > Format Page Numbers
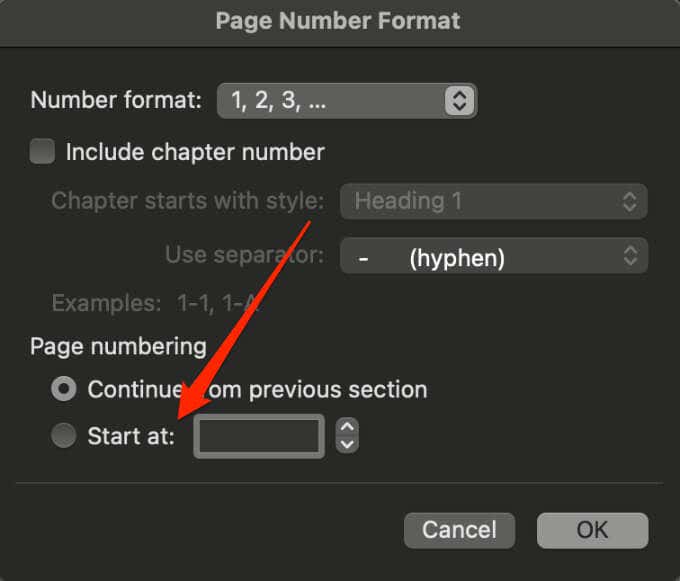
- Start at and set the value to whichever number you want to start indexing your page numbers. Click OK.
If you’re using Word Online in a web browser, you can’t start page numbering later in the document.
Remove Page Numbers in Word
If you no longer require page numbers in your document and want to remove all of them, you can do that in a few quick steps.
- Select Insert > Page Number > Remove Page Numbers on your Windows PC or Mac.
Note: If you don’t see the Remove Page Numbers button, double-click the header or footer, select the number and then select Delete.
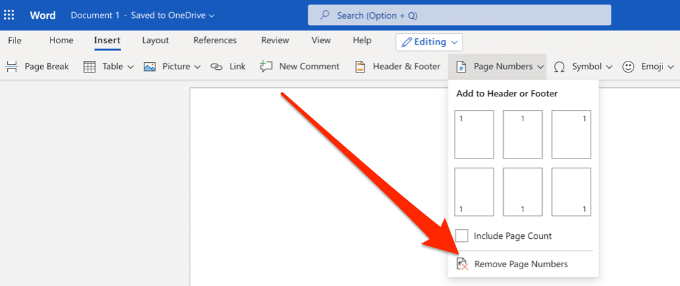
- In Word Online, select Edit Document > Edit in Word for the web and then go to Insert > Page Numbers > Remove Page Numbers.
How to Insert Page Numbers in Google Docs
As with Microsoft Word, you can insert page numbers in Google Docs. However, in Google Docs, the numbers aren’t automatically included on the pages.
It’s easy enough to add page numbers starting from a specific page, specific sections of the document or to the whole document.
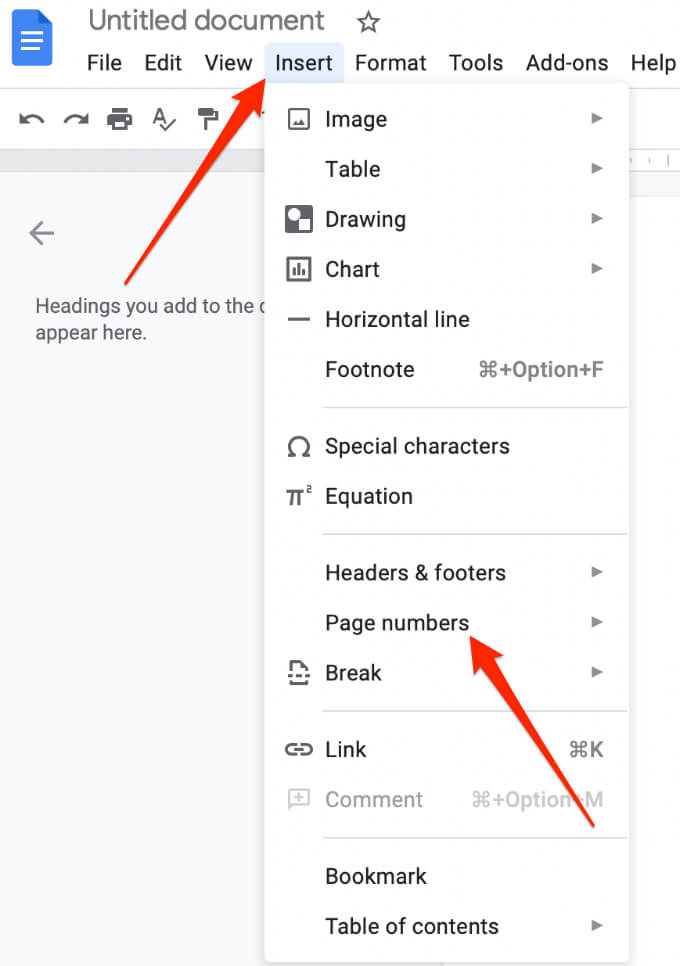
- Open a Google Doc, select Insert > Page numbers.
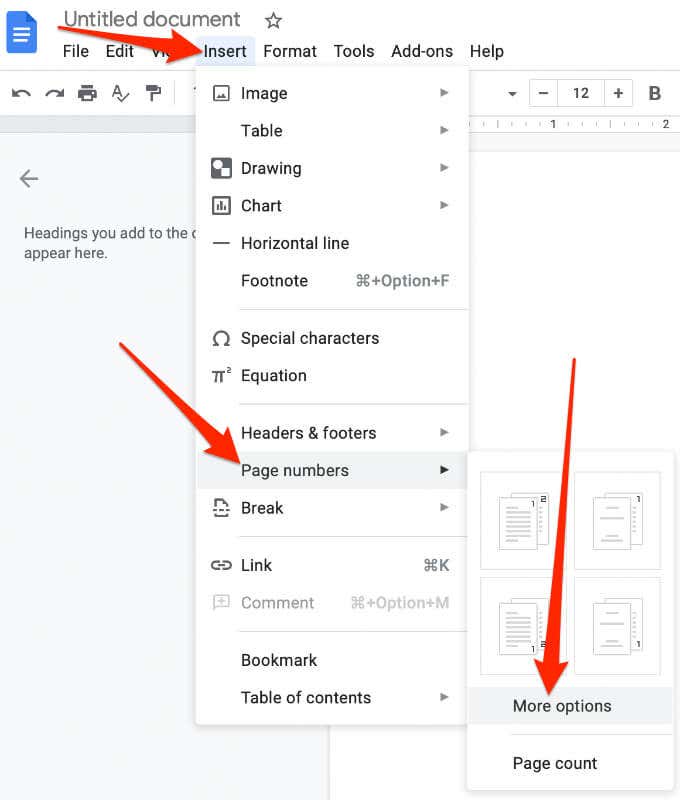
- If you want to start page numbers to a specific page or section, select Insert > Page numbers > More options.
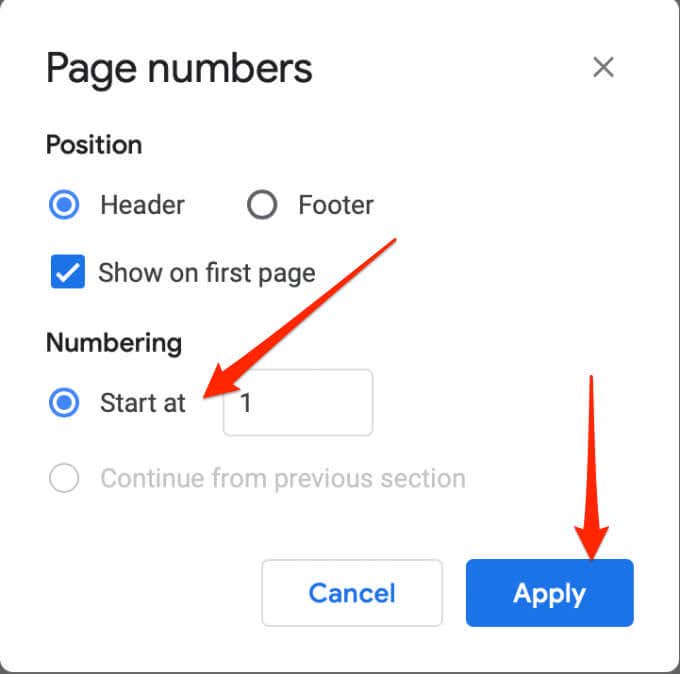
- Select Start at and choose where you want to position the number and then select Apply.
Note: If you don’t see the Apply option, select a section of your content, select Insert > Break, and choose a break type to add a section break.
Start Page Numbering on Page 2 in Google Docs
For a multi-page document, you can start the page numbering on the second page instead of starting from the cover page.
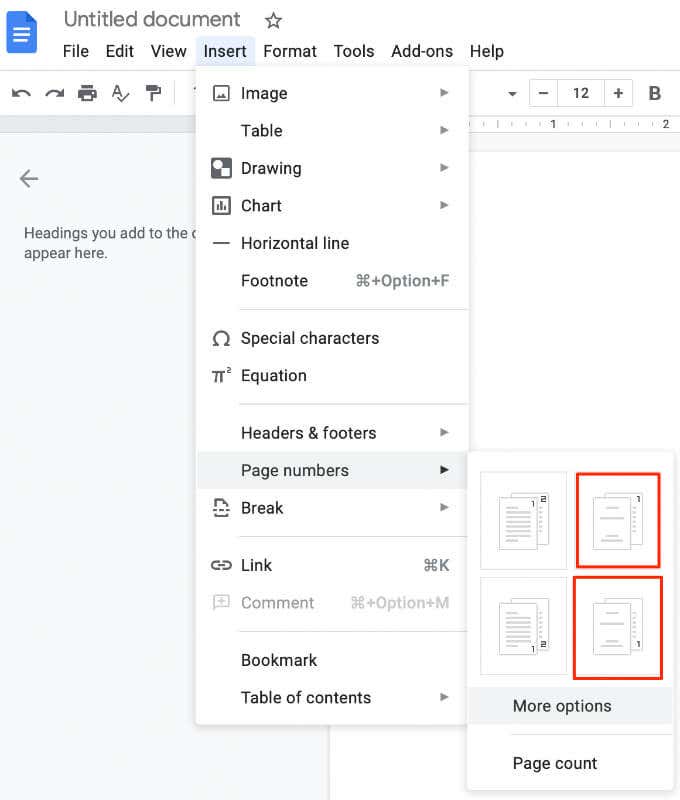
- Select Insert > Page numbers
- Choose to add page numbers to the header or footer of each page except the cover page. Choose the icon with number 1 shown on the back page for this option.
Find Your Way Around a Document
When your document requires numbers on each page, you can easily insert them in Word or Google Docs using the steps above.
We’d love to hear your tips and tricks to insert or format page numbering. Tell us about it in a comment.


